Diet & Fitness

Showing posts with label Diet & Fitness. Show all posts

Thursday, 27 August 2020

Homemade Unsweetened Applesauce


Applesauce is one of a great substitute for white sugar if you don't have other natural sweetener available in your pantry.
I made this as a sugar substitute for my healthy, diabetic-friendly brownies which I uploaded in my Youtube channel a few days ago.

If you're curious on how I made a healthier version of brownies, here's the link of the video. This version of brownies is not only healthy, but also bursting with flavors!


This was actually my second time I made my homemade applesauce, while my first version I made applesauce for my sweet potato avocado brownies a few years ago.
For my first version, I didn't cook my applesauce - Add an apple, a tablespoon of lemon juice and water in a blender and blend, that's it!
The uncooked applesauce is suitable to be used right away while the traditional cooked applesauce, you can keep for few days in refrigerator.
The good thing is, this version of applesauce is sugar free and made with only four ingredients.

The traditional way of making applesauce is first, you need to chopped your peeled apples into small cubes or chunks and cook over medium heat together with cinnamon stick or cinnamon powder and sufficient amount of water until the apples chunks are tender, about 20 minutes.
Then, to make it smoother, you'll have to puree the applesauce by using an immersion blender or food processor until it becomes creamy.


But, if you don't have an immersion blender, you can always use a normal blender to puree your applesauce if want it to be creamy.
Some people prefer to have apple chunks in their applesauce, but for me, I like it to be creamy in texture.

To reap all the nutrients from the apples, I prefer to leave the skin unpeeled.
Wash the apples thoroughly with salt water especially if you're not using organic apples and then rinse under running tap water.
I used three medium size of Fuji apples to obtain approximately 460 grams of applesauce.


For visual instructions, watch my video on how to make this applesauce here:


Store homemade applesauce in a mason jar and keep it frozen or refrigerated.
It can lasts for about a week if refrigerated and a few months if frozen.

If you're ready, let's get started.


HOMEMADE UNSWEETENED APPLESAUCE


Category : Diabetic Friendly Recipes, Diet & Fitness
Yield: 460 grams


Ingredients:


3 medium size Fuji Apples
3/4 cup of water  | 177 ml
Lemon juice from 1/2 lemon
1 cinnamon stick/1 tsp of cinnamon powder


Instructions:


Wash apples thoroughly using salt water and rinse under running tap water.  With the skin still on, cut the apples into 4 or 6 wedges and remove the core.  Then, cut each wedges into chunks.


Place apple chunks in a pot or a pan.  Add water, lemon juice and cinnamon stick or cinnamon powder.  Stir and bring to boil over high heat, then lower the heat, cover and simmer for about 15 to 20 minutes, until the chunks are squishy but not mushy. You may test doneness by poking a chunk with a fork or tip of a wooden spatula.  The apple chunks are cooked through when you can easily poke through the apple flesh.


Let the mixture slightly cool then pour the mixture into a blender and blend until mixture is smooth.
Pour the applesauce into a mason jar and once it is completely cool, the applesauce is ready to use.  Keep the applesauce refrigerated or frozen to prolong it's shelf life.


Friday, 29 November 2019

Bread Maker Apple Carrot Bread


It's been so long since I've intended to bake a carrot bread.
I bought a bunch of carrots yesterday during my groceries shopping, so, why not make one, right?
And it's not only carrot that flavored this bread because the bread has been infused with apple and cinnamon to enrich the aroma.

Baking a bread with grated carrot and apple not only add flavors and natural sweetness, but the combination of these rich water content foods will also add moisture to the bread.
I made the bread without an egg, so this bread is perfect for those with allergy to egg and vegan.
You are welcome to substitute butter with coconut or vegetable oil and fresh milk with almond milk or plain water for this recipe.
As usual, I prefer my bread to have refreshing milky flavor, even for my other baking products such as buns, cookies and cakes.  The authentic milk flavor, with slight sweetness offer a complete satisfaction.
The cinnamon really shine and add the intensity of the carrot and apple flavors.

This bread is so easy to be prepared, plus, the mixing and kneading works are done by the bread maker machine.
You can have a freshly baked apple carrot bread for your morning breakfast!
The carrot and apple are grated and they will release their juices as the machine mix and knead the dough.
So, during the process, you might need to monitor and add more flour if the batter is too mushy or soupy until the dough forms a smooth ball.

Because carrot and apple already provide the natural sweetness to the bread, I didn't put a lot of sweetener anymore.
I used a tablespoon of honey for my bread.
You may also use brown or white sugar and other low carb sweeteners.
As long as you're using active yeast, the bread will definitely rise and fluffy.

One thing I like to use bread maker to make my bread, it is so convenient to prepare, you don't need to wash too many utensils like when you're preparing your bread using the traditional method and bake the bread in the oven.
My Hubby likes to have bread for his breakfast, so, I like the idea of adding more fibers and nutrients in our home made bread, rather than to skip carbs entirely in our diet.
The most importantly, always control the portion intake.

Actually, as I'm finishing this entry, I already on my way of making the second batch of apple carrot bread.
It is wonderfully delicious and scrumptiously flavored that you can enjoy the bread by itself.
As you're serving the bread, I would recommend slathering it with Malaysian coconut egg jam, or any other spread of your choice.  
You may also drizzle it with maple syrup or honey butter glaze, as these toppings really kick it up a notch.
We both like to spread my home made Malaysian coconut egg jam, or we called as "kaya" on our apple carrot bread.
I used a medium size Granny Smith apple for this recipe, but Fuji, Gala and Honeycrisp would work as well.

In my second recipe, I added blackcurrants and butterscotch chocolate chips into my apple carrot bread.
It was awesome and a perfect combination of taste!
So, go on and experimenting on your carrot bread, alright! 😉😉


BREAD MAKER APPLE CARROT BREAD


Make: 1 pound loaf


Ingredients:

Approximately 1/2 cups of fresh milk
1 tablespoon of butter (can be replaced with vegetable oil)
1/2 teaspoon of salt
1 tablespoon of honey (can be replaced with white sugar/brown sugar/low carb sweetener)
1 grated apple
2/3 cup of grated carrot
1 1/3 to 1 2/3 cups of bread flour
2/3 cup of whole wheat flour
1/2 teaspoon of cinnamon powder
1 1/2 teaspoons of dry active yeast
1/3 cup of black raisins/blackcurrants - optional
1/3 cup of butterscotch chocolate chips - optional


Instructions:

  1. Add the ingredients in the bread maker machine according to the direction provided by manufacturer.  I added the ingredients according to the sequence as I listed above.  For the bread flour, begin with adding 1 and 1/3 cups first.
  2. Select the menu basic/ white bread and press "Start."  As the machine is mixing the dough, monitor the process and add more flour little by little if the dough is too slack, as the apple and carrot release their juices. Stop adding flour once the dough forms a smooth ball and no longer stick to the bread pan.
  3. Add in raisins and butterscotch chocolate chips (if using) when the machine signals for Raisins/Nuts addition, which is usually 5 or 10 minutes before the end of kneading cycle.
  4. Wait until the machine finished baking the bread.
  5. Once completed, detach the bread pan from the machine.  Be careful and do not touch the pan handle bare hand, wear a glove and then flip the pan onto a wire rack to cool the bread completely.
  6. Slice the bread with a bread knife according to the desired thickness.
  7. Store the bread in an air-tight container or zip lock bag and refrigerated for longer life span. 
  8. To reheat, you may steam the bread, or wrap the bread in aluminium foil and microwave for 2 minutes or bake in oven at 150℃ for 10 minutes or until the bread is warm enough.


MALAY VERSION


ROTI APEL LOBAK MERAH MENGGUNAKAN BREAD MAKER


Menghasilkan : 1 pound roti


Bahan-bahan:

Lebih kurang 1/2 cawan susu segar
1 sudu besar mentega (boleh ganti dengan minyak sayuran)
1/2 sudu teh garam
1 sudu besar madu (boleh ganti dengan gula pasir/gula perang/pemanis rendah carbohidrat)
1 biji apel di parut
2/3 cawan parutan lobak merah
1 1/3 hingga 1 2/3 cawan tepung roti/berprotein tinggi
2/3 cawan tepung wholewheat
1/2 sudu teh serbuk kayu manis
1 1/2 sudu teh yis kering
1/3 cawan kismis hitam/blackcurrant - tambahan
1/3 cawan butterscotch chocolate chips - tambahan


Cara-cara:
  1. Campur kesemua bahan dalam mesin bread maker mengikut aturan yang diberikan.  Saya masukkan bahan-bahan mengikut senarai di atas.  Untuk tepung roti, mulakan dengan mencampurkan 1 1/3 cawan tepung dahulu.
  2. Pilih menu "basic/white bread" dan tekan "Start."  Semasa mesin sedang mengadun adunan, sentiasa pantau dan jika adunan terlalu lembik (adunan melekat pada loyang roti), tambah tepung roti sedikit demi sedikit hingga doh menjadi kental dan berbentuk bola yang licin.
  3. Masukkan kismis dan butterscotch chocolate chips (kalau menggunakan) bila mesin mengeluarkan signal Raisin/Nut, iaitu 5 ke 10 minit terakhir untuk proses menguli.
  4. Tunggu sehingga mesin selesai membakar roti.
  5. Setelah roti siap dibakar, keluarkan loyang roti dari mesin (gunakan sarung tangan) dan terbalikkan loyang roti di atas redai untuk mengeluarkan roti dan biarkan sejuk.
  6. Potong roti menggunakan pisau pemotong roti mengikut ketebalan yang dikehendaki.
  7. Simpan roti di dalam bekas kedap udara atau zip lock bag dan boleh simpan di dalam peti sejuk supaya roti tahan lebih lama.
  8. Untuk panaskan roti, boleh gunakan kaedah kukus, bakar menggunakan bread toaster atau bungkus roti menggunakan aluminium foil dan panaskan menggunakan microwave selama 2 minit atau ketuhar pada suhu 150℃ selama 10 minit atau sehingga roti cukup panas.


Monday, 5 August 2019

3 Ingredients Chocolate Banana Ice Cream (Vegan, Gluten Free)


Chocolate banana ice cream is our favorite ice cream now, and I've been making it repeatedly for weeks.
It has smooth textured, exactly similar with the store bought ice cream.
But this one is a healthier ,gluten free and vegan version of ice cream that everyone can indulge without guilt!
The best part is - you don't need an ice cream maker to make it.
It is so refreshing, rich in chocolate banana flavors that make us crave to eat more and more.

This ice cream is perfect for any occasions - as dessert, pre or post- workout treats, breakfast or snack.
It is free of refined sugar, making this ice cream a delicious, guilt-free treat rather than having a glass of store bought fruit juice or a can of soda beverage.
You don't need to add sugar or any sweetener, as bananas are already packed with sugar in the form of sucrose, fructose and glucose.  
Every 100 grams of banana contains 12 grams of sugar and the sugar content vary according to their ripeness.  
Despite of its high sugar content that can elevate your blood sugar, banana has lower glycemic index (GI)  and adequate amount of fiber to control blood sugar spikes.
So, to avoid excessive sugar added to your ice cream, don't use over ripe bananas.

You might wonder why chocolate-banana combination are so popular especially among the health junkies.
A lot of food bloggers showcase their delicious muffins, cakes, ice creams, sorbets, smoothies, cookies and pies by using this combination.
All I can say is chocolate and banana, when combined, they exert an absolute satisfaction not only to your palate, but also to your overall health.
Dark chocolate or cocoa powder has polyphenols that can put you into a happier mood and antioxidant do a lot of contributions to your body more than you can imagine.
Banana is an instant energy booster and together with cocoa powder, they control blood sugar and slows digestion process, so they won't bring your blood sugar to the roof.
So, go ahead and try a lot more delicious treats with chocolate and banana to reap their benefits!

Last time my hubby and I used to buy a box or two of ice creams to be eaten plain or with our favorite waffles and brownies, but as we aware and become more conscious, that is, to think before you eat, we stop buying ice cream and I am glad that I found a better option to ease our ice cream craving.  
With this chocolate banana ice cream, it's not only improves my mood swing, it gives a sense of relief without getting anxious on how many pound I'll be gaining after indulging my favorite ice cream.

If you are just like me, looking to shift to a healthier option for ice cream, this chocolate banana ice cream is perfect for you!


3 Ingredients Chocolate Banana Ice Cream

Course : Desserts, Healthy Snacks
Serves : 3


3 large ripe bananas - chopped and frozen for at least 3 hours
3 tablespoons of dark cocoa powder
1 1/4 cups of almond milk/ drinking water
1 to 2 tablespoons of honey (if necessary)

Toppings (optional)

Chocolate chips
Sliced banana

Methods:

  1. In a bender or food processor, put in the frozen banana chunks and add in milk.  Pulse until smooth.
  2. When the mixture is smooth, add in cocoa powder and honey (if using) and blend until all the ingredients are well incorporated.
  3. Transfer the mixture into a container and put back in the freezer for at least an hour.
  4. When the ice cream is solid and scoopable, serve immediately.


#NOTE#

I recommend you to use ice-crusher blender or powerful blender as frozen bananas are very hard and forcing your normal blender to fiercely blend them will damage the blender motor.  Blender need to have enough horse power to crush the frozen bananas, with the motor has at least 400W of power.
To put on a constant blending process will also burn and damage the motor.  So, firstly, you need to just briefly pulse for few times until the frozen bananas crushed into smaller pieces, then gradually increase the duration for each pulse until they become smooth textured.


Sunday, 4 August 2019

Easy Whole Wheat Waffles (With Storing & Reheating Tips)


As I began to shift towards practicing a healthier lifestyle, my inner desires push my cooking creativity a step further, into making a more nutritious, wholesome dishes.
I still remember those days where my hubby and I enjoyed having awfully delicious chocolate vanilla waffles with a scoop of chocolate mint ice cream on top at Gelare, a desserts-only cafe in Damansara.
The waffles were crispy on the outer while the inner part was fluffy and spongy.
That's the perfect waffle's texture that every waffle lovers wish to indulge!

It's been quite some time since the last time I remembered I was making waffles.
Waffles, even though it's one of my favorite breakfast and dessert options, just because I've grown up without much exposure to eating waffles, they're always been out of my cooking lists.

Waffles are versatile breakfast option especially in Western countries.
They can be eaten with almost anything, not limited to butter and maple syrup.
If you are having sweet tooth like me, you can top your waffles with fresh fruits, fruit jams, chocolate or peanut butter spreads.
Savory toppings worked well on waffles too!
Next time I'll definitely top my waffles with salad and grilled chicken.


I made whole wheat waffles yesterday when my hubby was on his off day, to be eaten with strawberry and chocolate hazelnut spreads.
I still have a packet of fresh strawberry and a small bunch of bananas in my fridge that I can topped on my waffles.
By following exactly on the recipes of 100daysofrealrood, my waffles turned out perfectly as I wanted!
For vegan, I'm not sure if you could find the perfect substitute for egg as I haven't tried any egg substitute before.
The original recipe called for melted butter.
But if you are allergy to dairy products - such as butter and milk, you can opt for plant-based oil such as vegetable oil, corn oil, olive oil or coconut oil.
I used coconut oil to replace butter and almond milk as a substitute of a regular dairy milk.
It was my first time I made whole wheat waffles and they were a big hit to us!
I'll surely be making these waffles again and keep them frozen.

I was so excited to make my first whole wheat waffles that I forgot to carefully read the instructions.
Wet ingredients (milk, honey, melted butter/oil and eggs) were supposed to be added first and whisk to combine then followed by the dry ingredients.
I did it the other way around.
Luckily that did not affects my waffle's outcome.
So, you can either mix the wet ingredients first then add in dry ingredients or alternatively, mix the dry ingredients first then pour in the wet ingredients.


Easy Whole Wheat Waffles

Serves : 4
Adapted from 100daysofrealfood

1 1/2 cups of white whole wheat flour
2 teaspoons of baking powder
1/4 teaspoon of baking soda
1/4 teaspoon of salt
1/2 teaspoon of cinnamon powder (optional)
1 tablespoon of honey
1 3/4 cups of almond milk
1/4 cup of coconut oil
2 large egg

Methods:


  1. Preheat waffle iron and grease the surface with oil.
  2. In a bowl, add in flour, baking powder, cinnamon powder, baking soda and salt.  Whisk to combine.
  3. Add in almond milk, coconut oil and crack in the eggs.  Mix well until all the ingredients are well incorporated and lumps are disappeared.
  4. When the waffle iron is hot, by using a small ladle, pour in about 1 to 1 1/2 of the batter and spread evenly.
  5. Cook the waffles according to the instructions that came along with your waffle iron, or until it turned brownish and crispy.
  6. Serve warm with your favorite toppings.


HOW TO GET A NICELY SHAPED WAFFLES?

It's pretty absurd to ask such question, but there is actually tips on how to make your waffles shaped nicely and more appealing.
First - make sure you preheated your waffle iron sufficiently before you pour in waffle batter onto the waffle iron.  This is important to get evenly cooked waffles.  Otherwise your waffles will have a lot of pale spots.
Second - do not pour in too much or too little waffle batter into your waffle iron.  When you put too much batter, the excess batter will leak to the sides, creating side crust.  While too little batter will result in flattened shape waffles.  Adjust accordingly until your waffles shaped nicely.  

CAN WAFFLES BE FROZEN?

Yes, absolutely!  In fact, waffles are a good option for meal prep and and be prepared earlier.
Store your waffles in an air-tight container and keep them frozen or refrigerated.
Frozen waffles can last up to two months while the latter can last up to one to two weeks.
When you decided to make ahead your waffles, do cook them just until they turned lightly brown, so the color won't be too dark when you reheat them especially when you use oven, toaster or waffle iron.

HOW TO REHEAT WAFFLES?

I haven't tried frozen my waffles before because we gobbled all on the same day. 😂😂😂
But according to a few websites which I referred to, waffles can be reheated by using four options:

  1. By using oven - Reheat your waffles about 7 to 8 minutes at 180℃ or until the outer layer is crispy.
  2. By using microwave - Reheat your waffles for 30 to 60 sec, depends on whether you're reheating a frozen or refrigerated waffles, or until they feel warm to touch.  Waffles won't turned crispy if your reheat using microwave.
  3. By using toaster - You can use this method if the slots on your toaster is wide enough.  It'll make your waffles crispy on the outside.
  4. By using waffle iron - I prefer this method to reheat my waffles.  Put your waffles back inside the waffle iron and reheat until the outer later is crispy.

Frozen waffles can be reheated straight away until they are soft and fluffy again.
However, if you afraid that your waffles will get hardened once you reheat them, especially when you use microwave or oven, you can wrap your waffles in aluminium foil.
But wrapping with aluminium foil won't get your waffles crispier because the trapped vapor will keep them moistened.


Saturday, 27 July 2019

Easy Whole Wheat Tortilla (Vegan & Egg Free)


Tortillas aren't a big part of my family culture.
Being living in an Asian country; Malaysia, our staple carbohydrate source is rice.
Then..migrating to live my adult life in the city of Malaysia has helped me to explore different food choices from all over the world.
Whats more, internet makes our life so convenient that helped to resolves our curiosity on various eating cultures by just a quick search on the search engines.

So this is how I am able to create my own whole wheat tortillas.
I found a few whole wheat tortilla recipes from websites with very simple preparation.
This is my third time I was making my own tortillas and the previous two I made two years ago by using plain flour.
I can't recall how my previous tortillas looked like.
I was so excited to share on the outcome of my homemade whole wheat tortillas that I can't wait to blog about it!
After making few mistakes, especially during the dough resting time, I finally managed to overcome excessive dough retraction when I cook my tortillas.
All I can say is it is easy to prepare yet challenging to produce the perfect outcome.
Here, I am going to share with you on how to reduce your tortillas from excessive retraction when you rolling or cooking them.

I am sure you are familiar with the magical word of GLUTEN.
What does gluten do and how it can affect the shape of your dough?

Gluten is a kind of protein that form elastic network when flour is moistened and manipulated.
It helps to shape and hold the structure of baked goods.
Without gluten, your cookies may crumble at the touch.
RESTING is another important factor in getting the perfect structure of any kind of baked goods and and tortillas aren't an exception.
Resting allows the gluten to relax and easily reform the protein strand for the final dough shape.

During my tortillas making experiment yesterday, I had my dough well rested for 1 hour.
But I was still struggling to shape my dough into a thin, round layer tortillas-like shape.
I wonder what was wrong with my tortillas dough (I felt really frustrated at that time!).
After struggling to shape two portions of the dough, even though the rolled dough is not as thin as I wanted, I still proceed to cook them.
And guess what, both of them were severely retracted during the cooking process and became much smaller in size!
Then, I tried to flatten the rest of the portions into a small disc-shaped like with my palm and have them rested for another 10 minutes.
And finally, I was able to easily shape my dough thinly and my tortillas weren't retracted when I cooked them.  Yeah!

Next time, when I make tortillas, I'll make sure to flatten the dough first before put it to rest.
When you flatten the dough, the protein stands are adjusted into that shape so when you roll your dough, it won't retract.

I added 1 cup of all purpose flour as I don't want my tortillas to be too dense in texture.

Easy Whole Wheat Tortilla

Course : Breakfast, Snack, Lunch, Dinner
Yield : 12


2 cups of wholewheat flour
1 cup of all purpose flour
1 teaspoon of salt
1/2 cup of vegetable oil
Approximately 1 cup of warm water

Methods:


In a large mixing bowl with attached flat beater, add whole wheat flour, all purpose flour, salt.  Mix until all ingredients are well incorporated.

Slowly add in vegetable oil and warm water while mixing. Knead the dough until a soft, non-sticky ball is formed.  Add in more flour or water when necessary.

Alternatively, if you are using bread machine maker, pour in all the ingredients and select the menu to "dough" and press the "start' button.


Floured your working surface with flour.  Take the dough out of the mixer and transfer it onto the floured surface.


SHAPING THE DOUGH


NOTE: This picture was taken before I flatten the dough. For easy shaping the dough later, flatten the dough balls first.

Divide the dough first into two, then cut each portions with another six small portions like cutting a pizza.  Roll them into round shape balls and flatten the balls with your palm. Store the flatten dough in a container or ziplog bag and let rest for at least 20 minutes.  (To prevent them from sticking, coat each of the flatten dough with flour).


Dust the surface with generous amount of flour and place one dough at the center.  Dust a wooden rolling pin and the top surface of the dough with flour and roll into a thin, round shape.


COOKING THE TORTILLAS


Heat a flat pan or cast iron griddle to medium low heat.  Grease with little oil if necessary.

When the pan is hot, add tortilla. Flip to the other side when bubbles start to formed.  For eating tortillas on the spot, cook until brown spots have formed on the surface.  To make tortillas for storage, cook for about 20 seconds for each sides, just until light brown spots have formed.

Cover the tortillas with a towel to prevent exposure to the air and the cooked tortillas from getting stiff.

Serve warm with favorite toppings and gravy.


STORING THE TORTILLAS


Keep the leftover in a ziploc or air-tight plastic bag and store in refrigerator until ready to use.


Friday, 15 March 2019

Kung Fu Telur Dadar Mudah & Sihat


KUNG FU TELUR DADAR?

Pernah tak dengar menu tu?  Kalau belum pernah maknanya anda dah berjaya melayari ke laman yang betul..Hihi...

Menu ni ciptaan Lyn sendiri..Tapi tak tahu la kalau-kalau menu ni memang betul wujud.  Konsepnya serupa dengan menu kuew teow kung fu yang kita semua biasa makan di kedai makan, bezanya cuma kung fu telur dadar ni, seperti namanya hanya menggunakan telur dadar.  Berbeza dengan kuew teow kung fu yang menggunakan kuew teow yang digoreng bersama telur yang telah dikocok terlebih dahulu.

Resepi ni sangat mudah dah ringkas dengan bonus tambahan "sihat" lagi.  Kenapa Lyn cakap menu ni sihat ialah:

  • Kuahnya penuh dengan sayur-sayuran mengikut pilihan
  • Sangat kurang penggunaan minyak
  • Rendah karbohidrat terutamanya simple carbs seperti kuew teow
Menu ni antara menu favorite Lyn tiap kali berdiet rendah karbohidrat.  Menu ni bebas dari simple carbs seperti kuew teow yang jugak merupakan makanan proses, Sumber karbohidrat adalah berasaskan sayur-sayuran sahaja.So scrambled egg kung fu atau kung fu telur dadar ni is consider as a clean eating menu dan hanya menggunakan sedikit saja bahan perasa iaitu stok ayam. Baru-baru ni masa Lyn shopping barang dapur di Giant ada la terjumpa kiub ayam jenama Knorr yang bebas MSG.  Teruja sebab nampak perkataan bebas MSG je terus Lyn beli.  Tapi memang nampak sikit perbezaannya dengan kiub ayam Knorr yang biasa tu.  Kalau yang biasa tu rasa ayam dia enhanced dan lebih kuat, al maklum la kan ada encik MSG kan.  Tapi yang bebas MSG ni rasanya ala-ala stok ayam homemade yang dibuat guna rangka ayam yang direneh lama pakai slow cooker.  Memang malas nak membuat stok ayam sendiri lebih-lebih lagi memang agak susah nak mencari rangka ayam kecuali kalau kite pergi ke kedai menjual ayam segar atau pun di pasaraya Checkers.

Penggunaan bahan-bahan untuk penyediaan kuahnya adalah tertakhluk kepada citarasa sang tukang masak ok.  Lyn macam biasa la ketulan ayam boneless yang dipotong dadu wajib ada.  Cuma malam ni seafood jer takde.  Kalau ada seafood lagi sedap kuah kung fu tu lebih-lebih lagi udang.  Memandangkan seafood takde, so Lyn ganti dengan fish balls.  Jadik la kan, asal ada sumber makanan laut walaupun fish balls ready made.


Lyn masak kung fu telur dadar ni untuk our late dinner sebab hari ni hubby Lyn bekerja shift petang.  So, pukul 9.00 PM baru keluar dari office.  Dah malam-malam ni kami tak prefer makan makanan tinggi karbohidrat sebab takut perut tak sempat nak habis digest kami dah berdengkur pulak kang!  Hahaha...lepas tu penyakit pulak yang datang...huhu..

Tanpa membuang masa jom kita tengok dulu resepinya.

Resepi Kung Fu Telur Dadar Mudah & Sihat

Bahan-bahan:

2 ulas kecil bawang putih (ketuk dan cincang halus)
1 keping dada ayam (potong dadu)
segenggam kobis bunga (potong kecil)
segenggam brokoli (potong kecil)
1/5 batang lobak merah (hiris nipis)
3 batang cili padi (ketuk)
1/2 peket kecil fish balls
700 ml air
1/2 kiub ayam
garam 
sedikit minyak untuk menumis
1 sudu besar tepung jagung (campur dengan sedikit air)
2 biji telur (untuk didadar)

Bahan tabur:

bawang goreng
hirisan daun sup
hirisan daun bawang
hirisan cili besar merah
perahan jus limau

Cara Membuat:
  1. Panaskan minyak dalam wok, tumiskan bawang putih sebentar hingga keperangan dan masukkan ketulan ayam.  Tumis sebentar dan masukkan air.
  2. Masukkan kiub ayam, diikuti dengan cili padi ketuk, lobak merah dan fish balls.  Reneh sebentar hingga lobak agak lembut.
  3. Kemudian masukkan sayur-sayuran dan reneh hingga sayur-sayuran lembut.(Hati-hati jangan terlebih masak pulak sayur tu).
  4. Akhir sekali masukkan air bancuhan tepung jagung dan perasakan dengan garam.
  5. Untuk telur dadar, pecahkan telur sebiji dan kocok bersama secubit garam.  Goreng telur dengan menggunakan non-stick pan.  Ulang langkah ni untuk telur yang seterusnya.
#NOTA#

Resepi ni Lyn sediakan untuk 2 orang makan.  Macam yang Lyn cakap tadi, bahan kuah boleh sesuaikan mengikut citarasa.

Kalau suka boleh tambah 1 sudu besar sos tiram sewaktu dan masukkan air.

* tak nampak telur sebab dah terendam ke dalam 😅😅😅


Thursday, 25 October 2018

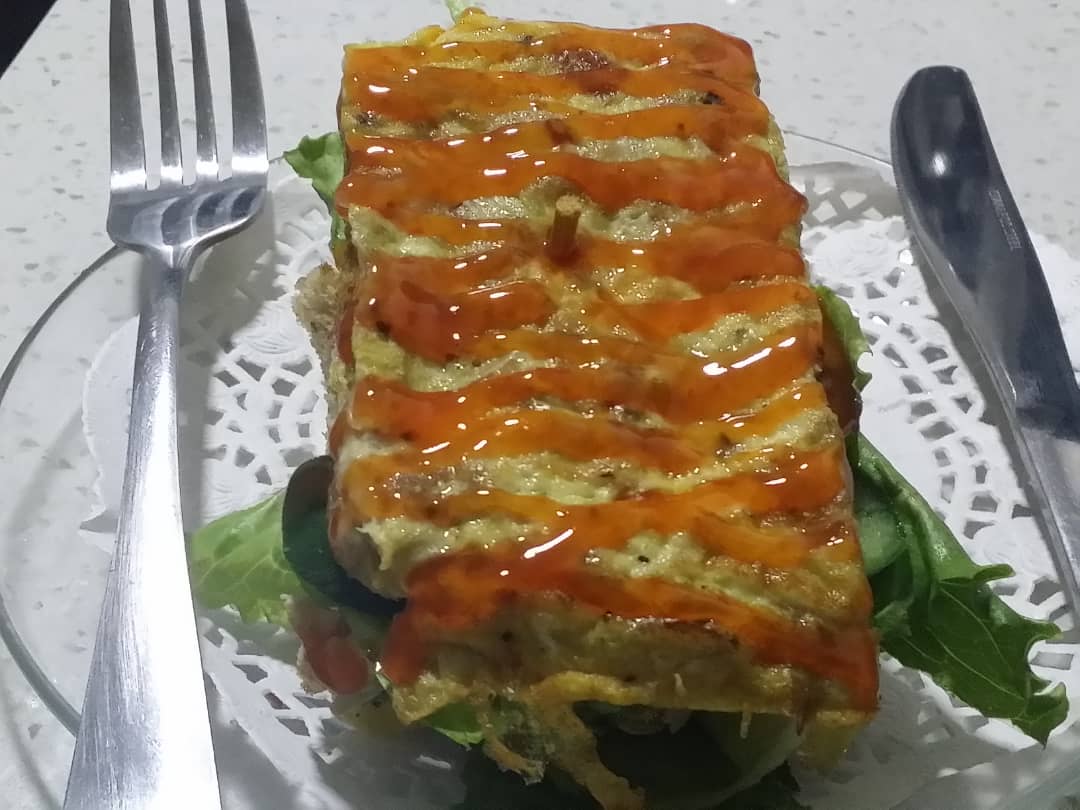
Egg Based Breakfast Idea 3: "Roti John" Style Wholemeal Bread Slice With Minced Beef


Roti John is one of Malaysian's favorite night market and Ramadhan bazaar snack. It is basically a mixture of eggs, onion, meat along with other spices fry in a long bread, like the size of a baguette but softer in texture, such as the texture of burger bun.

According to the oral history, Roti John gets its name when a Malay hawker named Abdul used to sell a baguette filled with omelette at his stall at Koek Road to a group of British soldiers every Thursday after their meeting at the Union Jack Club in North Bridge Road.  So, every time the British soldiers came to his stall, he used to say "Roti" which refers to the bread and "John" which refers to the white men.  So every time Abdul was asking them, " Do you want bread, John?" That's how the name of Roti John was developed.

Roti John is originally made of French toast, but now most of the local sellers are using softer bun in order to meet the local taste.  So, Roti John is considered a local version of burger filled with fried omelette, dress with salads and other vegetables and drizzle with sauce and mayonnaise.


Today, what I'm going to share is another modification of Roti John, the healthier version using wholemeal bread slices with only little chili sauce for drizzle.  No mayonnaise and other fattening salad dressings added. The concept is all similar as I used eggs with salt, black pepper, diced onion and minced beef for the egg mixture.  Because I used slice breads, to make my own style Roti John look thicker, I stacked 3 bread slices, and have them cut into halves.  So for 3 slices of bread, I got 2 sets of "Roti John."

It is perfect to feel your stomach with these healthy and fulfilling breakfast.  It is easy to prepare and you can also pack some of these "Roti John" for your lunch in the office.

I used my homemade wholemeal bread for this recipe. You can find my wholemeal bread recipe here (wholemeal bread).

The Ingredients:

3 slices of wholemeal bread
3 large eggs
1/2 big onion (diced)
1 teaspoon of black pepper powder
1/4 cups of minced beef
1/2 teaspoon of salt
butter
salad
cucumber
chili sauce

Methods:

1. Prepare the egg mixture by adding onion, salt, black pepper and minced beef. Mix well and set aside.

2.  Cut the bread slices each into half and spread half teaspoon of butter on top of bread slices.

3. Heat a flat pan over a medium heat and add in a tablespoon of vegetable oil or butter and pour 1/3 of the egg mixture onto the pan and place 2 pieces of the bread with the buttered surface at the bottom on top of the egg mixture. Split the fried egg mixture into 2 following the size of the bread pieces. Flip the bread pieces over to make the other side little crispy.  Repeat the step for the remaining bread pieces.

4. Top each layer of the "Roti John" with salad and cucumber and stack the 3 pieces of the bread.  Drizzle chili sauce on top and pin the "Roti John" with wood skewers so that all the layers stay intact.

Serve immediately.


Alternatively, if you don't like beef, you can always replace with prawn, chicken and crab sticks. You may also add in green onion and capsicum in the egg mixture. 

Enjoy!


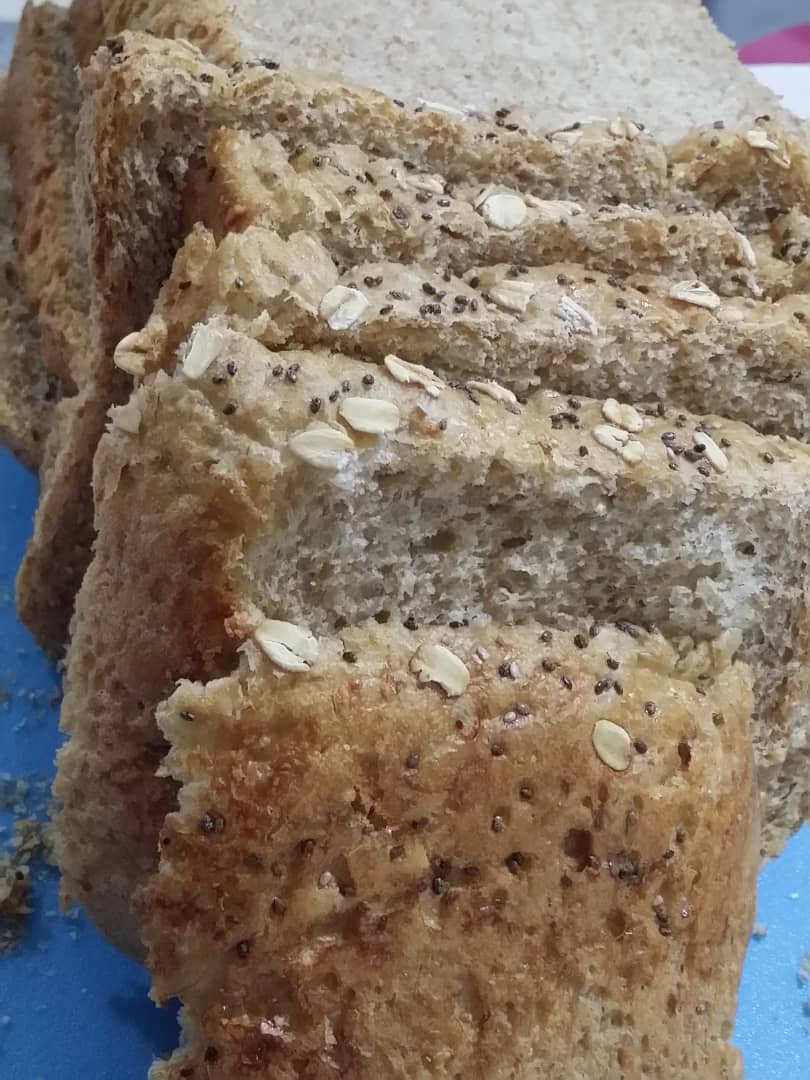
Bread Machine Recipe: Easy Wholemeal Bread with Oat and Chia Seeds


I always love bread. Any kind of bread. So it does includes a range kind of breads like wholemeal, plain, chocolate raisin, zucchini, butterscotch, cheese and chicken ham bread roll and so on. (I won't have enough room to list all my favorite breads). Eheh..

Last time, when my brother ran a small bakery, while helping him doing the bun packaging, I secretly smuggled a few freshly baked buns inside my bag to bring them back. I just love the taste of then bun even without the filling. It was so tender, moist, fluffy and delicious that I hadn't think of buying my favorite bun outside again. That was the old story. Now, he had stopped running the bakery and shifts to other business. Since before this I haven't yet to learn making bread on my own, so, whenever I feel like eating my favorite breads and buns I have to buy them at the bakery shops.

One thing that I don't really like about bakery bread and bun is that their so light in texture, even the weight of the buns are lighter comparable with homemade buns and breads.  Instead of taste milky and being moist and fluffy as we expect them to be, the bakery breads and buns are mostly dry and tasteless.  That is the reason why the taste of bakery breads and buns are dependent on the filling and the toppings.

But...I don't prefer to always put a nice, expensive and luxurious fillings and toppings because all I need is the simplicity yet delicious, fluffy and rich in taste breads and buns. So, to get such a perfect breads and buns, I decided to make them myself.

I am so determine to make my own breads, so my hubby bought me a bread maker machine last year to encourage me in making our homemade bread.


Today I am going to share with you one of my favorite wholemeal bread recipe. I prefer to make wholemeal bread rather than white bread as wholemeal bread is richer in fiber and has practically lower glycemic index because it is consider as complex carbs. It is not only delicious but it makes you feel full longer as it takes more time to be digested.

I made this for our next day breakfast. The bread maker took almost 4 hours to complete the bread making process, so be sure to plan your time to prepare your homemade bread so that you can enjoy having your bread freshly baked from the bread maker. Yeay!

The best part of using this magic machine is that, you just put all the ingredients straight away into the bread maker and it will do everything for you, from the mixing, kneading and lastly baking. Sound easy, right? So, everybody can make their own bread.  No more buying the factory and bakery made one. Eheh..

You may find thousands of bread maker machine recipes online, even a small booklet of consists of the basic bread recipes is provided when you purchased the bread maker machine.  To be honest, I no longer have the book with me now as I misplaced it somewhere.  This recipe that I will share today is my favorite wholemeal bread recipe which has been adjusted according to my preference.  I added oat and chia seeds in my bread for additional nutrition.  I have to confess that I don't like to eat oat with milk alone.  So, the best way to force myself to eat oat is to add in my bread and muffin.

Basic Wholemeal Bread with Oat and Chia Seeds
(Make 1 pound bread)

The Ingredients:

1 cup of fresh/ evaporated milk
1 tablespoon of butter
1 tablespoon of vegetable oil
1 egg
1/2 teaspoon of salt
2 tablespoon of sugar / honey
1 cup of wholemeal flour
1 2/3 cup of high protein flour
3 teaspoons of instant dry yeast

Topping:

egg wash
2 tablespoons of chia seeds
2 tablespoons of rolled oat

Methods:

  1. Put all the ingredients into your bread maker machine following the orders as listed above.
  2. For my bread maker, I just program the machine for basic bread. Then press Start.
  3. Always check the dough consistency during the kneading process, and add water of flour little at a time, if necessary until the perfect dough is formed.
  4. You can start brushing the top surface of the bread with egg wash and sprinkle with chia seeds and rolled oat when the third rest is reached, that is the final dough rest before the baking process.
  5. When the bread is done, remove the bread pan from the machine. After 5 minutes, you can dislodge the bread from the pan by flipping the bread pan onto a wire rack or you can place your bread on the wire rack with the surface on top.
  6. Cut the bread using a bread knife when the bread is completely cool.  Store in an air tight plastic or container so that your bread is not expose to the air.


Tuesday, 23 October 2018

Resepi Bergedil Tempe Mudah


Assalamualaikum wbt semua pembaca...Moga kita semua senantiasa sihat dan gembira dalam menjalani kehidupan di samping menggalas tanggungjawab masing-masing. Sejak dua menjak ni cuaca memang tak menentu. Cuaca yang sekejap hujan sekejap panas sekarang ni membuatkan kesihatan saya sedikit terganggu disebabkan masalah seasonal allergy yang saya alami semenjak kecil lagi.

Baiklah, kali ni saya nak kongsikan cara membuat bergedil tempe yang mudah lagi sedap dan menyihatkan. Hehehe..Mesti pelik kan bila sebut je bergedil tempe? Soalan pertama yang akan berlegar dalam kotak fikiran mesti rasanya, betul tak? Saya pun baru pertama kali teringat nak buat bergedil tempe ni. Dulu saya pernah menonton satu rancangan Omputih yang bertajuk "Cook Your Ass Off". Rancangan ni memaparkan kreativiti para peserta untuk mengubah sesuatu makanan yang tak sihat kepada versi yang lebih sihat. Contohnya, makanan kegemaran kanak-kanak iaitu Mac And Cheese atau makaroni keju seperti yang kita tahu memang sangat lazat bagi penggemar keju tapi malangnya kandungan kalori dan lemak tepu nya agak tinggi dan boleh memudaratkan kesihatan. Jadi, ni lah tugas para peserta yang memasuki rancangan tersebut untuk tukarkan versi Mac And Cheese yang lebih sihat. Contohnya, ada salah sorang peserta ni, (saya dah lupa nama nya), beliau menggunakan kelapa parut untuk menggantikan keju. Ada pula sorang housewife ni beliau menggunakan cottage cheese dan dibungkus dalam kulit dumplings. Lebih kurang macam tu la.

Pernah dalam salah satu episod rancangan ni, ada seorang chef yang merupakan vegetarian, jadi kesemua menu masakan beliau langsung tak menggunakan sumber daging. Beliau pernah menggunakan tempe sebagai sumber protein ketika menyajikan menu sihat berasaskan protein. Saya tak ingat bahan campuran tempe yang dikepal menjadi seperti bergedil yang beliau sediakan. Jadi resepi yang saya nak kongsi kali ni merupakan olahan saya sendiri.

Resepi Bergedil Tempe 

Bahan yang diperlukan:

2 keping tempe dalam plastik (tumbuk sampai hancur)
1/2 biji bawang besar (cincang)
1 batang cili merah (hiris nipis)
1 biji telur
1 sudu teh garam
3 sudu besar serbuk kari
6 atau 7 helai daun kari (cincang halus)
1/4 kiub ayam
2 helai daun bawang (hiris nipis)
2 sudu besar ketumbar (rendam dan tumbuk halus)
1 sudu kecil jintan manis (rendam dan tumbuk halus)
2 ulas bawang putih (tumbuk halus)

Sebelum digoreng
Cara penyediaan:

Satukan kesemua bahan di atas dan gaul rata. Kemudian, kepal-kepalkan adunan menjadi bebola kecil dan leperkan sedikit.

Goreng dalam minyak yang banyak. Angkat dan toskan.

Sedia dihidang!


Bergedil tempe versi ni berperisa kari. Rasanya lebih kurang macam vadei, snek popular kaum India. Anda boleh ubah suai bahan-bahannya mengikut citarasa anda. Bergedil tempe ni sihat dan kaya dengan protein soya. Sesuai dijadikan santapan ringan kepada sesiapa yang tengah berdiet rendah karbohidrat.

Sedap kalau makan bergedil tempe ni cicah sedikit dengan sos cili. :)

Selamat mencuba!

Thursday, 18 October 2018

Healthy Vege Spring Rolls


Spring rolls are crispy, light and filled with mostly vegetables suitable for snacks and side dish, and is a sibling of an Indian Punjabi favorite snack, samosa. Both of them are using the same pastry skin we called as popiah skin.

The traditional way of cooking spring rolls are to deep fry them, but the spring rolls recipe that I'm going to share with you today is the healthier version, that is the baked version of spring rolls instead of the authentic deep fried version. So, it's a good news for those who are on diet. Eheh! Besides of their oil- free version, these spring rolls are loaded with healthy vegetables. So you can munch these healthy version of spring rolls without the need to feel guilty!

The preparation of making these spring rolls are very simple, you don't have to make your own spring rolls's skin, you can easily bought them in the groceries stores.  The only thing that you need to prepare is the filling. Generally, you can make any fillings of your choice, it is not only restricted to vegetables, even chicken, prawn and meat would be perfect filling options. Cooking is about creativity, you can disobey the cooking instructions and follow your own ways. The most important thing is the end-results, that would determine whether or not you succeed in doing your cooking experiments.

I learned to make spring rolls from my mum, I can say she is a pretty good cook. Being a single mum for my elder brother and myself is definitely not an easy job, as she is being the bread winner of our family. So, I learned to cook quickly to help my mum ease her burden.  Fortunately, I love being in the kitchen, I inherit the love-to-cook genetics from both of my parents, and this is one of the recipe that my mum has taught me.

In the past, whenever we have "marhaban", we will definitely serve spring rolls to treat the Marhaban group members. Marhaban means "Welcome" or also known as Islamic caroling. During the Syawal month, the marhaban groups make house-to-house visits reciting prayers and praises for Prophet Muhammad SAW.

For the spring rolls filling preparations, lets have a look at the recipe.

Vege Spring Rolls Filling:

The ingredients:

1 medium size turnip (sengkuang) - julienned
1 Japanese cucumber - julienned
1/4 carrot - julienned
1 cup of bean sprouts - root removed
3 pieces of hard tofu - mashed
5 or 6 small onions *
3 cloves of garlic *
1 tablespoon of ground white pepper*
1/4 cup of water
1/2 anchovies stock cube (Knorr brand)
3 tablespoons of cooking oil
salt

Additionally, you can also add in bamboo shoots and long bean in your fillings. 

Methods:

  1. Thinly sliced all the vegetables. Set aside.
  2. Finely crushed all the ingredients marked with *.
  3. Heat the oil in a wok or cooking pan. Stir fry the crushed ingredients for about 2 minutes. Then add in the anchovies stock cube, water, salt, mashed tofu and julienned carrot. Continue stirring until the carrot soften a bit.
  4. Then, add in the remaining vegetables. Continue stirring to evenly mix all the ingredients. Do not overcook your filling or unless your vegetables will get soggy. We don't want to eat soggy vegetables, we want them to be crispy and tender.
  5. Remove the excess liquid from the vegetables filling by transferring the filling onto a heat proof food filter and place a bowl underneath the food filter to collect the excess liquid.
  6. Let the filling completely cool and the excess liquid drained before use.
How To Make the Spring Rolls:

Before you can start assembling your spring rolls, you need to prepare the gum paste. You can mix 2 tablespoons of flour with water and mix well until you get the runny consistency. You may also use white eggs for the gum paste. Then you need a damp kitchen cloth to cover the skins once you take them out of the plastic cover and have them separated. You may also need to prepare floured baking tray or you may put baking sheet on your baking tray.
1
Place the skins on a floured and dry work surface. Place the skin so that the one of the tip is facing you (like a diamond shape). Put 1 to 2 tablespoons of the filling along the edge which is facing you.
2
 Fold in the edges like you're folding a letter and roll towards the end tip.
3

4
 Brush the end tips with gum paste so that they stick neatly.
5
 Place the rolls on the floured baking tray. Brush the top of the rolls with egg wash.
6
Preheat oven at 200'C and bake your spring rolls about 15 minutes until golden brown. 

Serve warm with your favorite dipping sauce.

This recipe yields 25 pieces of spring rolls.

 There are two ways on how you can store the leftovers in freezer.  

To prevent your spring rolls from sticking to each other, the first method is to freeze the spring rolls first.  All you need to do is to arrange a single layer of the spring rolls in a baking tray, make sure to left some space in between each other and put in freezer for at least 1 hour until the rolls are firm and dry. Take them out and put inside an air tight plastic or container them put back inside the freezer.  Normally, a store bought unbaked pastry and rolls they use this method to store their products.

The second way is to wrap you spring rolls in cling wrap and put in an air tight plastic or container then keep them in the freezer.


Some tips to keep your spring rolls crispy:

# Place the baked rolls on a wire rack until they complete cool
# You must set the oven at higher temperature at least 200'C to make the rolls's skin crispier
# Don't ever keep your baked spring rolls in an air tight container unless they are already completely cooled, this is to prevent air vapor from forming and wet your rolls.