Bun and Pastry

Showing posts with label Bun and Pastry. Show all posts

Friday, 29 November 2019

Bread Maker Apple Carrot Bread


It's been so long since I've intended to bake a carrot bread.
I bought a bunch of carrots yesterday during my groceries shopping, so, why not make one, right?
And it's not only carrot that flavored this bread because the bread has been infused with apple and cinnamon to enrich the aroma.

Baking a bread with grated carrot and apple not only add flavors and natural sweetness, but the combination of these rich water content foods will also add moisture to the bread.
I made the bread without an egg, so this bread is perfect for those with allergy to egg and vegan.
You are welcome to substitute butter with coconut or vegetable oil and fresh milk with almond milk or plain water for this recipe.
As usual, I prefer my bread to have refreshing milky flavor, even for my other baking products such as buns, cookies and cakes.  The authentic milk flavor, with slight sweetness offer a complete satisfaction.
The cinnamon really shine and add the intensity of the carrot and apple flavors.

This bread is so easy to be prepared, plus, the mixing and kneading works are done by the bread maker machine.
You can have a freshly baked apple carrot bread for your morning breakfast!
The carrot and apple are grated and they will release their juices as the machine mix and knead the dough.
So, during the process, you might need to monitor and add more flour if the batter is too mushy or soupy until the dough forms a smooth ball.

Because carrot and apple already provide the natural sweetness to the bread, I didn't put a lot of sweetener anymore.
I used a tablespoon of honey for my bread.
You may also use brown or white sugar and other low carb sweeteners.
As long as you're using active yeast, the bread will definitely rise and fluffy.

One thing I like to use bread maker to make my bread, it is so convenient to prepare, you don't need to wash too many utensils like when you're preparing your bread using the traditional method and bake the bread in the oven.
My Hubby likes to have bread for his breakfast, so, I like the idea of adding more fibers and nutrients in our home made bread, rather than to skip carbs entirely in our diet.
The most importantly, always control the portion intake.

Actually, as I'm finishing this entry, I already on my way of making the second batch of apple carrot bread.
It is wonderfully delicious and scrumptiously flavored that you can enjoy the bread by itself.
As you're serving the bread, I would recommend slathering it with Malaysian coconut egg jam, or any other spread of your choice.  
You may also drizzle it with maple syrup or honey butter glaze, as these toppings really kick it up a notch.
We both like to spread my home made Malaysian coconut egg jam, or we called as "kaya" on our apple carrot bread.
I used a medium size Granny Smith apple for this recipe, but Fuji, Gala and Honeycrisp would work as well.

In my second recipe, I added blackcurrants and butterscotch chocolate chips into my apple carrot bread.
It was awesome and a perfect combination of taste!
So, go on and experimenting on your carrot bread, alright! 😉😉


BREAD MAKER APPLE CARROT BREAD


Make: 1 pound loaf


Ingredients:

Approximately 1/2 cups of fresh milk
1 tablespoon of butter (can be replaced with vegetable oil)
1/2 teaspoon of salt
1 tablespoon of honey (can be replaced with white sugar/brown sugar/low carb sweetener)
1 grated apple
2/3 cup of grated carrot
1 1/3 to 1 2/3 cups of bread flour
2/3 cup of whole wheat flour
1/2 teaspoon of cinnamon powder
1 1/2 teaspoons of dry active yeast
1/3 cup of black raisins/blackcurrants - optional
1/3 cup of butterscotch chocolate chips - optional


Instructions:

  1. Add the ingredients in the bread maker machine according to the direction provided by manufacturer.  I added the ingredients according to the sequence as I listed above.  For the bread flour, begin with adding 1 and 1/3 cups first.
  2. Select the menu basic/ white bread and press "Start."  As the machine is mixing the dough, monitor the process and add more flour little by little if the dough is too slack, as the apple and carrot release their juices. Stop adding flour once the dough forms a smooth ball and no longer stick to the bread pan.
  3. Add in raisins and butterscotch chocolate chips (if using) when the machine signals for Raisins/Nuts addition, which is usually 5 or 10 minutes before the end of kneading cycle.
  4. Wait until the machine finished baking the bread.
  5. Once completed, detach the bread pan from the machine.  Be careful and do not touch the pan handle bare hand, wear a glove and then flip the pan onto a wire rack to cool the bread completely.
  6. Slice the bread with a bread knife according to the desired thickness.
  7. Store the bread in an air-tight container or zip lock bag and refrigerated for longer life span. 
  8. To reheat, you may steam the bread, or wrap the bread in aluminium foil and microwave for 2 minutes or bake in oven at 150℃ for 10 minutes or until the bread is warm enough.


MALAY VERSION


ROTI APEL LOBAK MERAH MENGGUNAKAN BREAD MAKER


Menghasilkan : 1 pound roti


Bahan-bahan:

Lebih kurang 1/2 cawan susu segar
1 sudu besar mentega (boleh ganti dengan minyak sayuran)
1/2 sudu teh garam
1 sudu besar madu (boleh ganti dengan gula pasir/gula perang/pemanis rendah carbohidrat)
1 biji apel di parut
2/3 cawan parutan lobak merah
1 1/3 hingga 1 2/3 cawan tepung roti/berprotein tinggi
2/3 cawan tepung wholewheat
1/2 sudu teh serbuk kayu manis
1 1/2 sudu teh yis kering
1/3 cawan kismis hitam/blackcurrant - tambahan
1/3 cawan butterscotch chocolate chips - tambahan


Cara-cara:
  1. Campur kesemua bahan dalam mesin bread maker mengikut aturan yang diberikan.  Saya masukkan bahan-bahan mengikut senarai di atas.  Untuk tepung roti, mulakan dengan mencampurkan 1 1/3 cawan tepung dahulu.
  2. Pilih menu "basic/white bread" dan tekan "Start."  Semasa mesin sedang mengadun adunan, sentiasa pantau dan jika adunan terlalu lembik (adunan melekat pada loyang roti), tambah tepung roti sedikit demi sedikit hingga doh menjadi kental dan berbentuk bola yang licin.
  3. Masukkan kismis dan butterscotch chocolate chips (kalau menggunakan) bila mesin mengeluarkan signal Raisin/Nut, iaitu 5 ke 10 minit terakhir untuk proses menguli.
  4. Tunggu sehingga mesin selesai membakar roti.
  5. Setelah roti siap dibakar, keluarkan loyang roti dari mesin (gunakan sarung tangan) dan terbalikkan loyang roti di atas redai untuk mengeluarkan roti dan biarkan sejuk.
  6. Potong roti menggunakan pisau pemotong roti mengikut ketebalan yang dikehendaki.
  7. Simpan roti di dalam bekas kedap udara atau zip lock bag dan boleh simpan di dalam peti sejuk supaya roti tahan lebih lama.
  8. Untuk panaskan roti, boleh gunakan kaedah kukus, bakar menggunakan bread toaster atau bungkus roti menggunakan aluminium foil dan panaskan menggunakan microwave selama 2 minit atau ketuhar pada suhu 150℃ selama 10 minit atau sehingga roti cukup panas.


Friday, 4 October 2019

Soft Burger Buns


Some people agree that it is the patty and the dressings that would determine the deliciousness of a burger.
But I would say that the texture and the taste if the bun itself, along with the freshness of chicken or meat patty that make me want to eat more and more.

We can conveniently buy ready made burger buns from stores.
Some of them are topped with white sesame while others are remained plain.

Before I decided to give myself a try on making my own burger buns, I rarely cook burger at home.
Because I simply do not like the store-bought burger buns.
Store-bought burger buns tend to have very light texture, which is not to our liking.
So far I can say we prefer Mc Donald's burger buns more than any the others.
But nowadays we rarely eat fast foods and most of our meals are home prepared.

I don't usually crave to eat burger and in fact, burger is not listed as one of my favorite food.
And it was not until I saw Mc Donald's advertisement on their new burger menu on Youtube.
And that time, looking at how delicious and tempting they display their new burger recipe made me want to eat one.
I still have a packet of bread flour in my fridge, so I was thinking to making my own burger buns.
I also made my home made chicken and potato patties to be eaten with the buns.


Everytime whenever I prepared burger at home, I won't left mayonnaise behind.
We love mayonnaise in our burger.
I didn't buy mayonnaise, and since we have reduce our mayonnaise consumption, so I seldom buy it unless we feel like having it as a dipping or salad dressings.
Since making burger was not in my initial cooking plan, and we couldn't enjoy a burger without mayonnaise, so , I made my home made mayonnaise for the first time ever.
Luckily it turned well but it taste a little bit different from the store-bought one since I used corn oil instead of soy bean oil.

My hubby was extremely delighted to eat my home made burger, with home made patties and mayonnaise!
My burger buns were soft and fluffy, rich with sesame on top.
I adapted the burger bun recipe from the King Arthur Flour.
Their recipe is perfect for me and I am not going to use any other recipes for making my burger buns in the future.
Their burger buns are so beautiful and looks very tempting, so I was eager to make it.
You can use burger bun's molds if you have one to form uniform bun's shape.

I made two batches of buns and keep them refrigerated.
This burger buns are not only perfect for burgers, but also suitable to be eaten with mushroom soup or butter crabs.
Slice the buns like you're slicing baguette, spread butter or margarine if you like and grill the sliced buns on both sides.
The recipe used all purpose flour but I prefer to combine it with bread flour for fluffier and airy bun's textures.

If you wish to make your home made burger buns, so, here it is.
Don't look back because you're not going to regret making it on your own.
These buns are absolutely heaven!
It's worth your effort to make them.
Trust me..


SOFT BURGER BUNS


Adapted From : King Arthur Flour
Yield : 9 to 11


Ingredients:

3/4 to 1 cup of lukewarm water/ warm milk
1/4 cup of sugar
1 teaspoon of salts
2 tablespoons of butter/margarine/vegetable oil
1 egg
1 tablespoon of dry  yeast
1 teaspoon of bread improver - optional
2 cups of bread flour
1 1/2 cups of all purpose flour


Instructions:


  1. In a large bowl, mix all the ingredients. Adjust water and flour accordingly and knead to make a soft smooth dough.  Alternatively, you can use bread maker machine or stand mixer to prepare the dough.
  2. Cover the dough with a damp towel or cling wrap and let it sit for 1 hour in a warm place until the dough doubled in size.
  3. When the dough has risen, deflate it and divide into 9 to 11 portions. For average burger bun's size, you can divide the dough into 10 portions. Shape each portion into a round ball, flatten the dough ball a bit and place into greased baking pan, cover, and let rise for another 1 hour.
  4. When the buns are puffy, brush with egg white and sprinkle white sesame.
  5. Bake the buns in a preheated 200℃ oven for 15 to 20 minutes, until golden brown.
  6. Remove from oven and brush the buns with melted butter if preferred.
  7. Cools the buns on a rack and store the leftovers in an air- tight container and keep it refrigerated. 


Friday, 6 September 2019

Almond and Sausage Soft Pretzels


Pretzels have almost similar taste with bread due to similar ingredients used.
Pretzels are commonly shaped into a twisted knot like the one we use to buy from Auntie Anne's Pretzel.
Salt is the most common seasoning for pretzels.
I'm not sure if there is in fact specific salt for pretzels.
But I love to enjoy pretzels with different flavors.

We usually buy pretzels from Auntie Anne's Pretzel since I am not confident to make them on my own.
What makes their pretzels special is...instead of seasoned with mere salt, the pretzels have cheesy and rich butter aroma.
I think they seasoned their pretzels with parmesan cheese and the rich buttery aroma comes from the melted butter brushed to the pretzels once they are baked.
So, we wouldn't know unless we give it a try, isn't it?


Since we both adore pretzels so much, it can save a lot of money by making them ourselves.
I made my second batch of pretzels yesterday, while the first trial didn't tasted much like the original pretzels.
My first batch of pretzels had bread-like texture because I didn't add sufficient amount of baking soda in the soda mixture to soak the pretzels.
What makes pretzels different from common bread is the soda bath or wash, that gives the distinct skin texture and flavor of traditional pretzels.
Pretzels are a little bit chewy compared to the usual soft and spongy bread textures.

I baked my first batch on a baking paper and what happened was...the pretzels stuck to it!
I was so frustrated at that time because it was really a tiresome job to unstuck them!
I used the non-stick baking paper and I have never encounter such problem before when I baked my buns, cake and cookies.
But this one is different, probably because I did not pat dry the pretzels first on a towel after the soda bath.
I don't want to take any more risk of my pretzels sticking on the baking paper, so my hubby bought a silicone mat that they use to bake macaroon for me.
And yesterday's pretzels project was a huge success! Yeay!

I made three pretzels variations - cheesy sausage pretzels, plain pretzels and almond pretzels.
I even prepared my homemade chocolate sauce to be eaten with the almond pretzels.
My hubby like our homemade pretzels very much.
I seasoned my pretzels with parmesan cheese, a dash of salt and brushed the cooked pretzels with melted butter.
Till now, I still can smell the comforting aroma of the pretzels when they are baked.
The scent of cheese, combined with sweet, nutty almond flavors made our mouth water, like the aroma of baked pretzels of the Auntie Anne's.
But we like our homemade soft pretzels more now.
Sorry Auntie Anne, after this we'll be making our own pretzels.


So...what makes these yum yum pretzels so inviting and toothsome?

The secret is...use high quality or pure butter to brush on the pretzels, okay.
It really make a huge different, trust me..
My first batch of pretzels, I brushed them with Buttercup.
It was okay, but still I prefer to use pure butter.
So, for the second batch, I used SCS salted butter and the aroma and taste is much better than the previous one.
We are going to make the better version of our homemade soft pretzels, so I would recommend to use high quality ingredients.

I googled to get the soft pretzels recipe.
As I was looking for the recipe, I came across with two variations of soda bath techniques.
You can either bring water to boil in a pan, add in baking soda and boil your pretzels in the boiling soda bath for a few seconds.
Or..you can mix baking soda with a very hot water in a bowl, then soak the pretzels for a few seconds.
In the second method, the soda bath is not necessary too hot and you can use your hand to scoop out the pretzels.
I used the second method for making my pretzels as it's more convenient for me.
If you prefer the second method, you can prepare the soda bath before you work on shaping the pretzels.
Just make sure the water is hot enough as you add in the baking soda.


These soft pretzels can be refrigerated for few days in an air-tight container.
It's best to serve them warm, with your favorite dipping sauce.
I didn't use my bread maker to prepare the dough.
I kneaded the dough just until it smooth and no longer stick to my hand.
You may need to prepare extra flour and vegetable oil during the hand kneading process.
Be careful not to add too much flour, as we don't want hard and stiff pretzels, so you can oiled your hand while kneading the dough.


ALMOND AND SAUSAGE SOFT PRETZELS


Course : Breakfast, Snack
Adapted From : Crouton Crackerjacks 
Yield : 13


2 cups of warm milk
4 tablespoons of sugar
4 teaspoons of dry yeast
4 tablespoons of coconut oil/vegetable oil/melted butter
1 teaspoon of salt
5 cups of all purpose flour

Soda mixture:

3 cups of very hot water
4 1/2 tablespoons of baking soda


Seasoning:

Almond nibs
Almond powder
Parmesan cheese
Salt
Sliced cheddar cheese
Sausage
White egg from 1 egg
Melted butter


INSTRUCTIONS


Prepare The Dough

In a large bowl, combine warm milk, sugar and dry yeast.  Wait for 5 minutes until bubbles appear on the surface. 
Add in the remaining ingredients and knead for 5 to 10 minutes until a smooth, elastic, non-sticky dough formed.
Oiled the bowl surface and cover the bowl with a damp towel.
Let it rest for 1 hour in a warm area until it doubled in size.


Soda Mixture

Meanwhile, you can starts preparing the soda bath mixture.
Boil 3 cups of water and while it stills very hot, add baking soda and mix well using a spatula.
Set aside.


Shape The Pretzels

Once the dough is properly proofed, punch in and knead the dough for a while until it returns to its original size again.
Transfer the dough into a lightly floured work surface.
Divide the dough into 13 portions for normal soft pretzel's size.


For Almond and Plain Pretzels:


These two pretzels I shaped into a classic pretzel's shape.
Roll the dough to about 25 inches long, and make a U-shape with both ends pointing toward you.
Cross the ends twice, creating a twist.
Then, hold an end in each hand and fold it upward, press each end onto the curvature, to make a pretzel shape.
Place pretzels onto a floured surface until you're ready to soak them in the soda mixture.


For Cheesy Sausage Pretzels:


I made four cheesy sausage pretzels, to clear my sliced cheddar cheese stock.
Take one small dough and roll it to about 25 inches long depending on the size of your sausage.
Roll a sausage in one sliced cheddar cheese.
Starting at one end, carefully wrap the dough around the sausage wrapped with cheddar cheese, pinching each end to seal.
Place sausage pretzels on a floured surface and repeat with the remaining sausage.


Soak The Pretzels In Soda Mixture


Soak the pretzels in soda mixture for 20 to 30 seconds and place on a baking pan lined with silicone or macaroon mat.
If you're using baking or parchment paper, spray or grease with oil to prevent sticking and pat dry the soaked pretzels on a towel.


Bake The Pretzels

Preheat oven to 230℃.
For almond pretzels, brush the pretzels with white egg and sprinkle almond nibs on top.  Then, sprinkle with almond powder and Parmesan cheese.
For plain and sausage pretzels, sprinkle with salt and Parmesan cheese while the pretzel's surface is still wet.
Bake at the middle rack for 10 to 12 minutes, until dark golden brown in color.
For sausage pretzels, it may need a longer time to cook.  Once the surface turned dark brown in color, reduce the oven temperature to 150℃ and bake for another 5 to 8 minutes, or until the pretzel's sides bounce back once press with finger.
Once cooked, brush the pretzels with melted butter.


Serving and Storing The Pretzels

Serve the baked pretzels warm, with your favorite dipping sauce.
We eat our almond and plain pretzels with my homemade chocolate sauce.
Store the leftovers in an air-tight container and keep them refrigerated.
You can preheat your stored pretzels in oven or microwave.
Bake your stored pretzels at 150℃ for 10 to 12 minutes, or until warm to touch.


Saturday, 31 August 2019

Cheesy Chicken Pepperoni Bun (Eggless)


Today is about sharing another delicious bun recipe, a product which I like to make when my baking mood is uplifted.
I think lately I love to work with dough, from making cookies to making buns and steamed buns.
My hubby is going to clear his annual leaves, so he'll be on three days leaves in the next day onwards.
That's why I'm busy preparing buns, desserts and dishes to be frozen and refrigerated, to ensure our food supplies is sufficient for our next three "lazy" days.
Usually, I seldom cook whenever my hubby is around.
He loves to bring me out for sight seeing, usually somewhere outskirts of the city to clear the "always chaotic, relentless" mind of mine.
So, cooking and even blogging activities will be freeze until he resume back to work.

Today I baked cheese chicken pepperoni bun for my hubby's breakfast and snack box.
Initially, I wanted to make a pepperoni pizza, since we've been craving to eat pizza for weeks.
I prefer to make my homemade pizza, so I can add a lot of chicken pepperoni and mozzarella cheese on top.
But I just remembered that I still have a stack of large-sized paper cups for buns, which we bought last time.
So, why not making something different by using those paper cups, right?

If you had stumbled upon my post on cheesy onion tuna bun before, this buns recipe is almost similar to that one.
The only differences are I used white whole wheat flour to substitute all purpose flour and I replaced butter with coconut oil.
This bun recipe is eggless, so it is suitable for those who are sensitive to egg.
I made my buns a little bit smaller, so as to fit the paper cup's size.
I added bread improver, to helps my buns raise better.

If you don't have paper cups, you can flatten the dough balls on a greased baking pan and garnish your buns with toppings.


CHEESY CHICKEN PEPPERONI BUN (EGGLESS)


Course : Breakfast, Snack
Yield : 12


Ingredients:

2 cups of bread flour
1 cup of white whole wheat flour
1/ 2 teaspoon of salt
1 tablespoon of sugar
2 1/2 teaspoons of active dry yeast
1 teaspoon of bread improver - optional
3 tablespoons of coconut oil
3/4 to 1 cup of warm milk


Toppings:

Chicken pepperoni
Shredded mozzarella cheese
Mix herbs
Pasta/ marinara sauce


Instructions:


 Prepare The Dough

Manually (by hand):

In a large bowl, combine flour, salt, sugar, bread improver and yeast.  Stir to combine.
Then, add in oil and warm milk and knead until it forms a smooth, elastic dough (which is about 10 to 15 minutes).
You may need to add more flour if the dough is too sticky.
Lightly oiled the dough surface and cover with a damp towel or cling wrap, let it rests for 40 to 50 minutes until it doubled in size.

Using Bread Maker:

Combine all the ingredients in a bread maker bowl and select the menu "Dough."
Wait until the machine finishes the kneading process.
Cover the bowl with a damp towel or cling wrap and let it sit until it doubled in size.


Making The Buns


After the dough has risen, punch in and knead until it returns to it's original size.
Divide it into 12 small balls and put into a paper cup each.
Cover the dough balls with a damp towel and let them rest for another 30 minutes.


Baking The Buns


Preheat oven to 200℃.
By using your finger tip, flatten the the dough balls and spread half tablespoon of pasta sauce.
Sprinkle with mix herbs and lay 4 to 5 pieces of chicken pepperoni.
Lastly, top with shredded mozzarella cheese.
Bake the buns at the middle rack for 15 to 25 minutes.


Storing The Buns

Store the leftover in an air tight container and keep it refrigerated.
Do not keep the leftover bun at room temperature for more than one day, to prevent the filling from going stale.


Reheating The Refrigerated Buns

You can reheat your refrigerated bun straight away in oven or microwave.
Preheat oven at 160℃ and reheat your buns for 5 to 10 minutes, or until warm to touch.


Enjoy!


Thursday, 29 August 2019

Fluffy Indian Style Garlic Cheese Naan (Without Yogurt)


Today I'm going to share with you once again another dish that is so dear to my family.
I'm so passionate to try to make staple dishes from various cuisines, because sticking to a routine, mundane cooking habits and prepare the same dishes everytime will definitely kill my cooking interest.
To always stay motivated, I need to explore recipes and cook new dishes which allows me to improve my cooking skill and the most important is, to serve delectable delicacies to my dearest one.

So, here it is...

INDIAN STYLE GARLIC CHEESE NAAN.

Naan is a flat, yeast-leavened bread popular especially in Indian culture.
It's fluffy, soft in texture is definitely a heart-throb for Indian Cuisine lovers.
It's a must have dish to be serve in all Indian and Mamak restaurants.
Naan can be oval or round in shape, and is usually serve with curry, dhal and chicken tandoori.
Everytime I make my homemade naan, I'll prepare curry and tandoori as it's side dish.

The original naan version is plain flat bread, traditionally cooked in a tandoor, a clay oven shaped like a chimney pot.
The naan dough is stuck to the wall of the tandoor and cook until brown spots appear on the naan surface.
Because of the unique cooking method of naan, it is more common to be known as "Roti Tempayan" in Malay culture.
The tandoor used to cook naan is similar to the shape of tempayan (although  both have very different functions).
Instead of designed to cook naan in Indian Culture, tempayan is a large container made of pottery, usually used to store water.

Popular naan recipes - like garlic naan or cheese naan are the modified versions of the original, plain naan created to add more variety to the naan lovers.
My favorite naan is always the one with cheese.
But the recipe that I''ll share this time is as it's title, naan with added cheese along with garlic.
Garlic, especially if using the fresh garlic make the cheese naan flavorful and aromatic.
My hubby likes this naan version very much.
It's awfully delicious when enjoy with chicken tandoori and chickpeas curry that I'll provide the recipes in my next entry.

If this is going to be your very first time to make your homemade naan, don't hesitate because the good news is, it's easy to be prepared especially when you got the help from bread maker or stand mixer to do the kneading part, which I can say it's easy yet can be challenging to handle the quite sticky dough particularly when your do it by hand.
If you're going to knead the dough manually, you may need to prepare extra flour for dusting dough surface,  coat your hands and dust your working board.
Alternatively, introducing too much flour can cause your naan to gets hardened, so what you can do is, instead of using flour to prevent sticking to your hands, you can oil your hands and to your dough surface.

Due to it's fluffiness and fullness of cheese and garlic flavors, my hubby started to ask me to prepare this again!
As a matter of fact, as I'm updating this entry, it's actually my second time, after I made the initial naan the day before.
We finished off the first batch before I managed to take a single picture of my homemade naan!
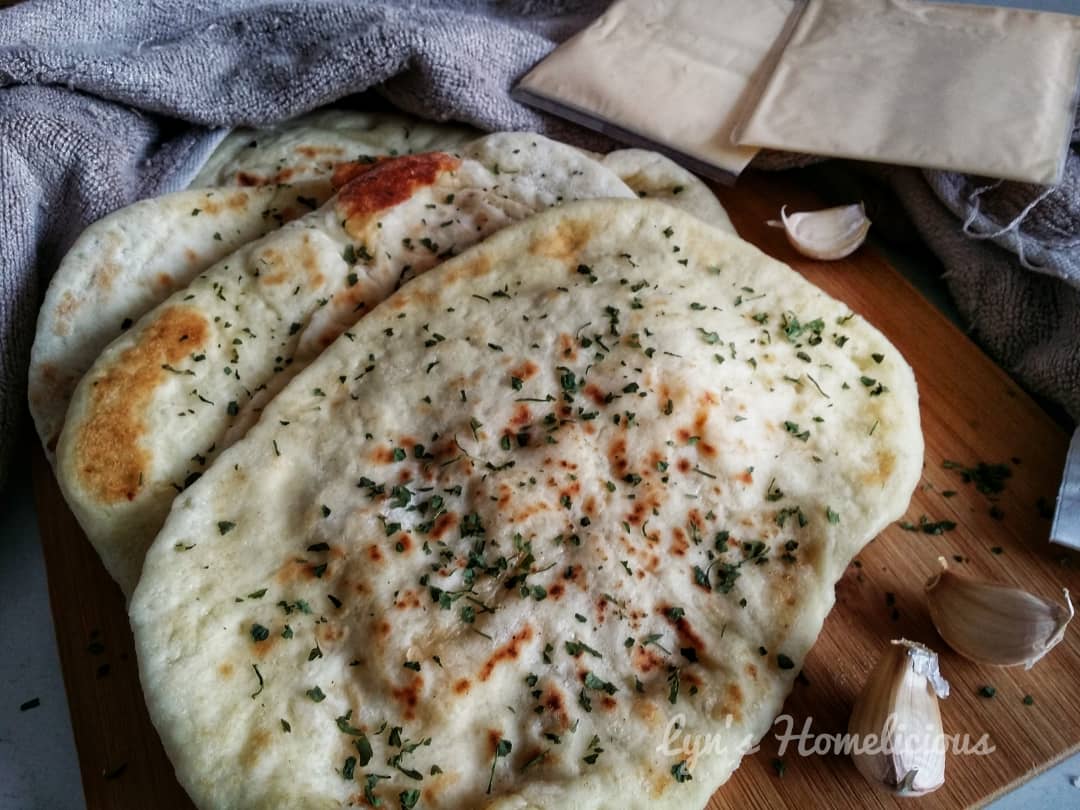
So this picture that I took is my second batch of the similar version of naan that I just made.
It's so desirable and close to the restaurant-style naan, or..if it's not too much, I want to confess that this naan version is far much better than the restaurant or the store bought naan.
I can make extra batches of these and keep them refrigerated.
So whenever we feel like eating them, all we need to do is just reheat them on a pan.

Here, since most of us don't have tandoor available at our home, you can cook your naan in two ways - by oven or stove top method.

I've tried both method but I still prefer to cook my naan on a stove top.

Why I prefer stove top method?

Simply because naan is originally cooked or roasted in a tandoor in a high heat generated by  charcoal or wood fire.
Thus, this method allows direct cooking of food with live fire.
Due to a higher temperature (can be up to 480℃), naan is cooked for a very short period of time.
Oven does not has this capability and when we cook for a longer time in oven with temperature less than 200℃, it will results in dry and your naan will become stiff.
I think the best way to overcome your naan from getting stiff and dry if you prefer to bake it in oven, try to set oven temperature between 220 - 240℃ and do not bake for more than 10 minutes.

But I would still prefer to cook my naan manually, on a stove top in a non-stick pan.
It's quicker and convenient especially for those who doesn't own oven at home.


FLUFFY INDIAN STYLE GARLIC CHEESE NAAN

Adapted From : chefdehome
Cuisine : Indian
Yield : 8


Ingredients:

3 1/3 cups of all purpose flour
1/2 tablespoon of sugar
1 teaspoon of salt
1 tablespoon of garlic powder/3 finely chopped garlic cloves
2 teaspoons of active dry yeast
1 cup of warm water
1/2 cup of fresh/evaporated/almond milk
2 1/2 tablespoons of vegetable/corn/coconut/olive oil
8 sliced cheddar cheese - cut into 4 each (naan filling)
More flour/oil for kneading and rolling naan

Toppings  & Garnish (optional)

Melted butter/ margarine/ghee - for brushing cooked naan
Chopped fresh parsley

Instructions:


Prepare Naan Dough

Manual Way:

In a large bowl, combine warm water, sugar, yeast and milk. 
Wait until it's foamy.
The, add flour, salt, oil and garlic paste/powder.
Knead the dough until a smooth and elastic dough formed (which is about 10 minutes).
If it's too sticky to handle the dough, add in more flour or oil.
The dough should not to wet or dry.
Cover the bowl with a damp towel or cling wrap and let it sit under warm place until it doubled in size.

Using Bread Maker:

Put in all the ingredients (except cheese) in the bread maker bowl and select the menu "Dough."
Wait until it finishes the kneading process which should takes place about 20 minutes.
Lightly oil a large bowl and transfer the dough into the prepared bowl and cover it with a dampt towel or a cling wrap and let it sit for 40 minutes (or more) until it doubled in size.


Shape The Naan

Once the dough doubled in size, punch in the dough and knead for a 1 minute to break the large air bubbles.
Floured your work surface and transfer the dough onto it.
Form a round shape, flatten it a bit and cut into 8 equal portions.
Form a small ball for each portion, cover the dough balls with a damp towel and let them rest for 5 minutes, so it'll be easier to roll the dough later as it won't retract too much.


Cook The Naan


Stove Top: 

Preheat your iron cast skillet or a non-stick pan in a medium heat, lightly oiled the pan.
Take one ball, flatten with a rolling pin (not too thin) and place 4 small pieces of cheddar cheese at the center.
Wrap the cheese neatly and roll it to form a flat, oval or round shape naan.
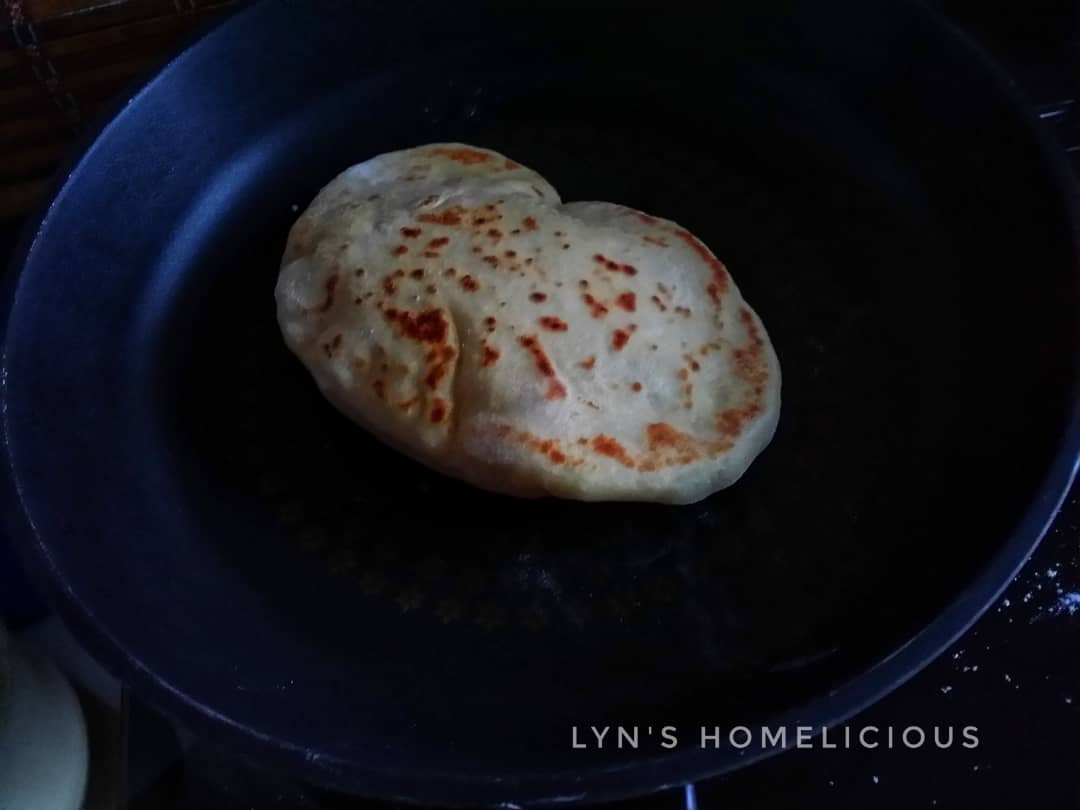
When the pan is hot, place one rolled naan on top and cook until you starts seeing a lot of bubbles form all over the naan's surface, which takes about 2 minutes.
Flip to the other side and cook until you see brown patches appear on the naan's surface.
If necessary, flip one more time to other initial side to brown the skin.
Repeat with the remaining dough balls.
Cover the cooked naan with a towel, or put in a container with cover to prevent it from getting hardened.

Flip the naan to the other sides once you start seeing bubbles formed


Serve The Naan:

Serve the garlic cheese naan warm with your favorite dipping sauce and toppings.
While it's still warm, if you want, you can brush the naan with melted butter or ghee and sprinkle with chopped garlic, parsley or chili flakes or chopped cilantro.
I prefer it plain, as I enjoy it with chickpeas curry and chicken tandoori.


Store The Naan:

If you plan to make ahead your garlic cheese naan, cook your naan halfway, just until the bubbles start to form.
Cool the cooked naan before putting them in an air tight zip lock bag or container and store in refrigerator of freezer until ready to use.


Reheat The Stored Naan

If you freeze your naan in a freezer, you need to defrost it first for 10 to 15 minutes then reheat the naan on a stove top or oven until it turns soft and fluffy again.


Pau Kelapa Pandan Tanpa Telur (Eggless Pandan Coconut Steamed Bun)


No matter how much we adore food from different cultures, there's nothing that can compare to our own local dishes.
I have a belief that I have to first to learn making staple dishes of my own culture before I make a step ahead to learn to make other dishes.
Because that's how we learn to differentiate between cultures, that is by knowing their signature dishes and their unique preparations.

Today I want to share another popular signature dish among Malay, Chinese and some other parts of Asian countries.
It's called steamed bun.
In Malay, we called it as "kuih pau."
It looks exactly like a bun, but instead of baking it oven, we use the steaming method to cook it.
I prefer to make my homemade steamed bun in several batches and keep them frozen.
Steamed bun is always one of my hubby's favorite snack and breakfast.

Basic pau shape is round and slightly flat.
Pau or known as Baozi is a quintessential street food in Chinese and Taiwanese cultures for centuries.
While Malay is well known for it's round shaped steamed bun, Chinese's baozi has a more unique shape.
It needs some skill in pleading the dough to obtain the nicely shaped baozi.
The fillings, they can range from sweet fillings like coconut filling, red bean filling, kaya (coconut egg jam) to savory fillings such as chicken or beef curry, rendang (savory chicken dish) and pork.


Today I made pandan coconut steamed bun, or pau kelapa pandan in Malay.
The steamed bun preparation consists of a few steps.
You may either prepare the the filling ahead of time then followed by making the dough.
Steamed bun's dough requires two cycles of proofing, first after you knead the dough to form a round shaped dough ball and the second proofing is after you stuff your dough balls with filling.
Lastly is steaming the buns.


The Importance of Kneading

A good texture steamed buns must have a soft, fluffy and the skin that bounce back when you press it with your fingers.
That is why kneading is very important in making steamed bun.
Kneading allows air bubbles to form evenly inside the dough and helps to obtain a smoother appearance of the dough skin.
Kneading can be done manually, by using your hands or with the helps of machine like stand mixer and bread maker.
Definitely, if you're using machine to do the kneading and mixing, it'll surely going to safe your energy!
For me, my steamed bun have a smoother and fluffier shaped when I knead after the dough has risen.
Usually the kneading process takes place before the first proofing.
Am I right?
However, if you knead your dough for two times - first before first proofing and the second one after the dough has risen, that is before you shape the buns until it returns to the original size.
These will helps to get a smooth look on your buns.

Pau dough before it is rested
After the first proofing, the dough is doubled in size
Punch and knead the dough until it returns to it's original size


How to know if the yeast is still active?

Another factor is to ensure the instant yeast that is used is still active.
To test it, simply combine warm water, sugar and the yeast and let it soaked for few minutes until large bubbles appear.
This indicates that the yeast is still active.
Add in some oil and baking powder will also contribute to the smooth and fluffy textured steamed buns.


Another tips to shape the steamed bun for a fluffier bun's texture

When you roll the divided dough into small balls, make sure not to roll them too thin (especially the middle part), otherwise your steamed bun may not turned fluffy as what you're hoping for.
You need leave the dough to be ticker in the middle part to allow more dough in the center, so that it'll rise nicely when you steam the buns.
This is important especially when you're making a round shape steamed bun.


When you roll your dough, make sure the middle part is thicker than the edges, to get a fluffier, bulgier pau.


How Long Does It Takes To Rest The Dough (First Proofing)?

Basically, you're required to let your dough well rested until it doubles in size.
It should takes about 40 minutes if the room temperature is high, but first proofing shouldn't be more than 2 hours unless the temperature is very cold.
Resting or proofing the dough is where the fermentation process takes place.

Tips to accelerate resting process, you can:


  • place the dough in a warm place, it can be either a place with exposure of sun light or nearby preheated oven.
  • use warm instead of cold, room temperature water to make the dough.
  • Heat up a glass of plain water in a microwave, then put your dough bowl inside (with the glass in) and shut the microwave door.
Make sure you cover the dough with a damp cloth or seal the dough bowl with a cling wrap, because apart from preventing the dough surface from getting dry, humidity also helps to improve fermentation rate.


How To Avoid Collapsing Or Wrinkly Steamed Bun?

The most common problem when making pau or steamed bun's are the skin collapse with wrinkly textured.
I faced the similar problems before.
Upon making a few trials, I can conclude that it can be due to the temperature use when you steam your bun.
I've came across some of the tips before, and it says that in order to prevent the steamed bun from sudden collapsing, you should wait for a few minutes before you uncover the steamer and the pau or steamed bun should be steamed under high heat.
I've followed this tips before and my pau were still collapsing with a lot ugly wrinkles on top.
I used my mum's old steamer with bigger holes.
So, I initially thought that was the culprit.
After several attempts, then only I managed to steam my pau perfectly.

The secret here is the steaming temperature.
You need to understand what cause the sudden collapse and wrinkles formation to your steamed bun.
Sudden collapse occurs when you steam your pau with high heat or temperature, the high pressure from the heat abruptly forcing your pau to it's maximum raising capability and sudden drop in temperature when you remove your pau away from heat source will leads to collapsing.
Second, steaming under high heat will cause a lot of water vapor formation and condensation of water vapors can drop onto the pau even when you cover the steamer lid with towel.
Third, I've tried this way for several times.  If can, try to put an empty steamer basket (if available) underneath the basket that you fill with pau to cook. 
This is to let some gap between the hot water at the bottom from touching the bottom of the steaming basket that contains pau.

The best way to avoid those problems is to steam your pau under low to medium heat.
Try not to steam under boiling water, as using a lower heat will allow your pau dough to rise gradually and smoothly.
You may extend your steaming time up to 20 minutes under low heat.


This is my experiment on different steaming technique that yielded 2 different outcomes.
As you can see in (A): pau is wrinkly  & collapsed
The problems:
1. I steamed under high heat (boiling water)  - I cover the lid with towel
2. I didn't put empty steaming basket in the middle to add more gap.
While in (B) : I resolved all the above problems, so my pau turned out perfectly.


As for the pau skin, you can remained it plain.
But when I make pau with sweet coconut filling, I prefer the combination of pandan and coconut flavors, and I want to add some color to their skin, that's why I added pandan juice in the dough.


Blend pandan leaves with water to get the pandan juice, strain before use to make pau dough


PAU KELAPA PANDAN
(PANDAN COCONUT STEAMED BUN)


Cuisine : Malay/ Chinese
Yield :20- 25


Ingredients:

1 1/2 pandan juice (blend 3 pandan leaves with 1 1/2 cup of water, strained)
1/4 cup of vegetable oil
a few drops of green coloring - optional
1/2 teaspoon of salt
1/2 tablespoon of sugar
1 tablespoon of sweetened creamer (susu pekat manis)
1/2 teaspoon of baking powder
500 grams or 4 1/2 cups of pau flour
2 1/2 teaspoons of active dry yeast
Additional 1/4 cup of water (if necessary)

Filling:

Sweet coconut filling (for recipe click here:
Inti Kelapa/ Sweet Coconut Filling

Others:

Paper cups/ baking paper/ banana leaf (cut into round/square shape) - to cover the bottom of the pau


Instructions:


PREPARE THE DOUGH

Manual Preparation :

Mix flour, baking powder, yeast, salt, sugar, sweetened creamer and oil in a bowl.
Add in pandan juice and green coloring while continue mixing.
Combine and knead the dough until it is smooth.
Cover the bowl with a damp towel or cling wrap and leave to rise in a warm place until it doubled in size.

Using Bread Maker:

Put all the ingredients inside the bread maker bowl and select the menu " dough."
Wait until it finishes kneading, which should takes about 20 minutes to complete.
Lightly oil a large bowl and transfer the dough into the prepared bowl.
Cover the bowl with a damp towel or cling wrap and leave to rise until it doubled in size.


SHAPE THE PAU/BUNS

After the dough has risen and doubled in size (about 40 to 1 hour), punch in the dough to break the air bubbles and knead the dough until it returns to it's original size.
Divide the dough into 25 portions (or 20 if you prefer them bigger in size), flatten the dough with a rolling pin or press with your fingers (remember to leave the middle part slightly thicker) and place a teaspoon (or more) in the middle and tightly seal the pau or bun.
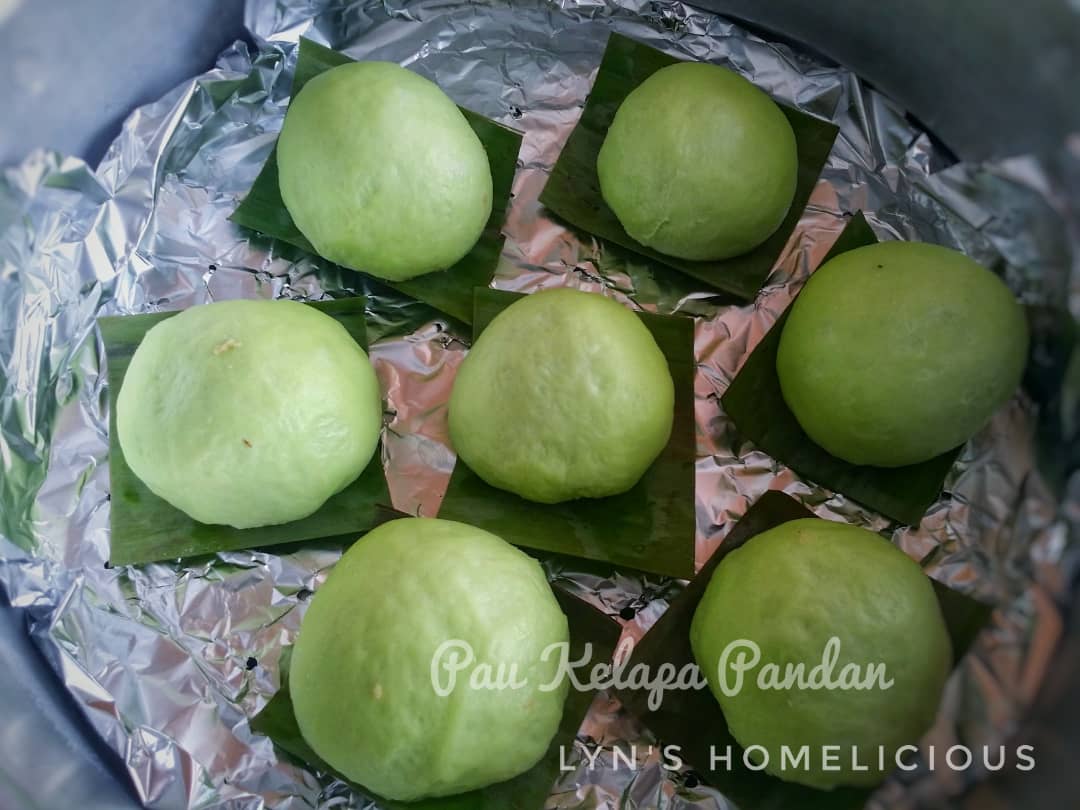
Place a sheet of paper cup or banana leaf cover the bottom.
Place all the assembled pau in a tray, make sure to leave some space in between and let them rest for another 15 to 20 minutes.
To prevent the pau's surface from getting dry, spray or sprinkle water occasionally until they are ready to be steamed.


STEAM THE PAU/BUNS

Arrange the pau into the steaming basket, allow two inches apart between pau and the side of the steamer.
(If your steamer's holes are too large, you can place a sheet of aluminium foil underneath the pau.  Poke a lot of small holes on it using a wooden skewer).
Preheat water until you see the vapor starts to form.
Cover the lid with towel or aluminum foil.
Steam the pau under medium heat for 15 to 18 minutes.

Leave some gap in between pau and the sides of the steamer to prevent sticking during steaming.
The freshly cooked pau ready to be eaten 😋


SERVING & STORAGE

Serve the steamed buns or pau warm.
You can freeze the leftover, keeping them in a container or sealed plastic.
You can straight away steaming the frozen pau until they turned soft again. (It should takes about 15 to 25 minutes).

Store the cooked pau in plastic bags and keep them frozen