Kuih Muih & Pencuci Mulut

Showing posts with label Kuih Muih & Pencuci Mulut. Show all posts

Friday, 15 May 2020

Resepi Sagu Mangga | Sago Mango Dessert


Pudding is not so common in our household since we favor savory treats for our snack.
Usually we devour fruits that we bought on their own, without turning them into desserts or even juices.
But my hubby bought two packages of small tapioca pearls, or we called as sago, and I was thinking to make a refreshing dessert for iftar.

Honestly, this was my first trial of making sago mango dessert.
It turned out to be really delicious!
The key to make this no-fuss dessert is to perfectly cook the sago with a lot of water, until they become translucent.
To cook the sago, you have to stir frequently to ensure they evenly cooked.
Rinse the cooked sago afterward to remove excess starch that'll make the sago stick to each other.


Some of the sago mango recipes called for usage of coconut milk, or coconut milk combined with evaporated milk to make the dessert.
If you're using coconut milk, you'll need to cook the milk mixture on the stove until it is smoky, but not yet to reach the boiling point.
This step is necessary to ensure the coconut milk is not raw and thus preventing it from spoiling, causing tummy upset😅.

I used white sugar in my sago mango dessert, but you can substitute white sugar with other sweetener of your choice.
The other options to replace white sugar are brown sugar, condensed milk, honey and maple syrup.
This dessert is meant to be enjoyed chilled, so you have to prepare it a few hours before it is served.
I tried eating the dessert the next day after an overnight chill, and guess what, it taste more flavorful!
When we let the dessert sit overnight, we allow more time for the mango flavors to evenly spread throughout the dessert and diffuse with other flavors.
I added grass jelly into my sago mango dessert, but you may also add mango flavored jelly or agar into it.

Alright! Lets get started.


SAGU MANGGA 

( SAGO MANGO DESSERT)


Category : Dessert, Pencuci Mulut
Serve: 6


Ingredients To Cook The Sago:


1 1/2 cups of small tapioca pearls (sago)
15 cups of water
1/4 teaspoon of salt
2 pandan leaves - knotted (optional)

Ingredients To Make Milk Mixture:


2 1/2 cups of boiled water
1 cup of evaporated milk
A pinch of salt
1/4 cup of white sugar
2 ripe mangoes
100 grams of grass jelly - optional


INSTRUCTIONS


Cooking the tapioca pearls:

In a pot, bring water to boil.  Meanwhile, place the tapioca pearls in a strainer  and clean small tapioca pearls under running tap water.  
Once the water is boiling, add cleaned tapioca pearls, pandan leaves and a salt.  Stir frequently and cook over medium heat until all the tapioca pearls are translucent, which takes about 30 to 40 minutes.
Strain cooked tapioca pearls in a colander and rinse once again under running tap water to remove excess starch.  Drain well and set aside.

Cutting The Mangoes and Grass Jelly: 

Rinse the mangoes and peel the the skin by using fruit peeler or a sharp knife.  
Cut along the sides of the mango's pit, which is flat and oblong is shape, to separate the mango's flesh from it's pit.
Place the mango pieces on a cutting board and slice them in parallel strips vertically, about 1 cm wide.
Then, cut 1 cm wide strips horizontally, to make cubes.
Place in a bowl and set aside.
Cut the grass jelly into cubes and place in another bowl.  Set aside.

Preparing The Milk Mixture:

In a mixing bowl, combine boiled water, evaporated milk, sugar and salt.  Stir until sugar is dissolved.

Combine Everything Together:


Add cooked tapioca pearls, cubed grass jelly and half of the cubed mangoes into the bowl containing the milk mixture.  Mix well.
Pour the mixture into 6 individual dessert cups and top with the remaining diced mangoes.
Cover and chill in the fridge for few hours or overnight.


TIPS:

This dessert is slightly runny. If you prefer the dessert to be thicker, you may reduce the liquid quantity to 3 1/4 (instead of 3 1/2 as per my recipe) and increase the quantity of evaporated milk to 1 1/2 cups (instead of 1 cup as per my recipe), then add 1 3/4 cups of boiled water to make the total liquid of 3 1/4 cups.

The dessert is of moderate sweetness.  You may increase sugar amount to 1/3 cup if you like your dessert to be sweeter.


Thursday, 2 April 2020

Talam Keladi Berlauk Daging ( Steamed Yam Cake In Coconut Milk)


It was my first experiment in making my homemade talam keladi berlauk aka steamed yam cake.
Apparently, there have been two versions of these kueh - the first one is the Chinese version of steamed yam cake, or they called as Taro cake.
Chinese version of steamed yam cake has no coconut milk (because coconut milk is not regular in most of Chinese dishes), usually added with Chinese sausages, Chinese mushrooms and the five spice powder.
The rest are pretty similar - with dried shrimp as the main seasoning and the cake batter is made using rice flour and a little bit of tapioca flour, corn starch and wheat flour to enhance its texture.
I actually enjoyed eating the Chinese version of steamed yam cake, the cake is stickier and savory - it is usually serve with spicy chili sambal and sweet black sauce (I'm not sure what is it called).

The second version - well, this is the version that I am going to elaborate further in this post, it is the steamed yam cake made with coconut milk.
This version of yam cake also uses dried shrimp as it's main seasoning, fried until fragrant and mix with fried shallots (bawang goreng), chopped green onions and chinese celery and sliced red chilies.
The yam is cubed and is either boiled until tender or stir fried until browned.
The cake batter preparation is almost similar with the first version, the only difference is that, coconut milk is added into this second version of steamed yam cake, making it sweeter and rich in nutty flavor.


I have no intention to make steamed yam cake when I bought two pieces of yam a few days back.
And the yams were left there in my fridge, untouched until a video of making steamed yam cake popped up in my recommended video lists in Youtube.
I was so excited to make it myself, thinking that it's not that difficult to be prepared.
Furthermore, this is going to be the first dish that'll be using the Chinese celery and green onion that I planted about two months ago in a vase in my balcony.
I just need to skip a few ingredients which I do not prefer to use for my steamed yam cake.
As I was preparing the ingredients, I was frustrated to learn that I have run out of the dried shrimp stock!  Arghh!! If only I noticed earlier, I should have bought it the day before.

So, I have to change my initial plan and make my steamed yam cake with minced beef instead of the dried shrimp.
It'll definitely taste different from the original version but to think it in a constructive way, this is going add a new twist into the dish, and a good option for those who don't like or is allergy to seafood.

Oh! Before I forgot, the texture for the steamed yam cake which made with coconut milk will not going to be sticky, unlike the Chinese version, since the fat coconut milk itself somehow helps to moisten the cake batter and I didn't add tapioca flour in it.
This cake is soft textured, but still firm enough to be cut into smaller pieces after it is completely cooled.
To complete the dish, I prepared two types of sauces, one is sweet and another one is spicy.
The sweet sauce is more or less like the Yong Tau Fu or Chee Cheong Fun sauce while the spicy sauce is pretty similar with the dim sum spicy dipping sauce.
The cake, as its name suggest, is to be steamed.
I use an 8"X 8" baking pan for this recipe, but you may also use a round baking pan or a casserole.

Lets get the nitty-gritty of this recipe.


TALAM KELADI BERLAUK DAGING
(STEAMED BEEF YAM CAKE IN COCONUT MILK)


Cuisine : Malay
Serve : 5 to 6


Ingredients:

500 grams of yam (cut into cubes)
200 grams of minced beef
3 cloves of garlic - chopped
1 teaspoon of white pepper powder
Approximately 5 tablespoons of cooking oil
Salt to taste
2 red chilies - sliced diagonally
1/4 cup of chopped green onions
1/4 cup of chopped Chinese celery
1/4 cup of fried shallots


For The Cake Batter:

2 cups of rice flour
1/3 cup of wheat flour
1/4 cup of corn flour
 1 1/2 teaspoons of salt
5 cups of coconut milk (I used 3/4 cup of coconut cream + 4 1/4 cups of water)


Instructions:

  1. Heat oil in a pan and fry the yam cubes until browned, remove and set aside.
  2. Using the same oil (add more if necessary), fry garlic until fragrant and slightly browned, add minced beef and season with white pepper powder and salt.  Fry until beef is opaque over medium heat.
  3. Turn off the heat and mix with sliced red chilies, chopped green onions and chopped Chinese celery.
  4. Next, in a large wok, combine rice flour, wheat flour, corn flour and salt.  Stir to combine.
  5. Pour coconut milk little by little while continue to whisk to avoid lumps formation.
  6. Cook the batter over low heat until it thickens (but not too thick) and  fold in fried yam and 1/3 of the beef mixture. 
  7. Pour the batter into the prepared pan greased with cooking oil.  Spread the batter with a spatula.
  8. Steam over medium heat for 45 minutes, or until inserted bamboo skewer comes out clean.
  9. Top the cake with the remaining beef mixture, light pressed down the topping with a spatula and steam for another 10 minutes.
  10. Remove from the steamer and let the yam cake cools completely before making an attempt to cut it. It should takes about 5 hours for the cake to completely cool.  You may pop it in the fridge, after 3 hours left at room temperature to accelerate the cooling process.
  11. Cut the cake with a sharp knife, soaked first in hot water to get nice, cleaned cut cake.  Or you may opt for plastic cake knife to cut the yam cake.


THE SAUCES


Ingredients for Sweet Sauce:

1/2 palm sugar (or 1 piece if you're using the smaller size)
1 1/2 cups of water
2 cloves of garlic - skin intact and crushed
2 tablespoons of sweet soy sauce
Salt to taste
1 tablespoon of corn flour (mix with 3 tablespoons of water)

Instructions:

Add palm sugar, water, sweet soy sauce and crushed garlic in a pot and bring the mixture to boil over medium heat.
Lower the heat and add the corn flour mixture.  Allow the mixture to simmer gently over low heat until it thickens to your desired consistency.  Season with salt.
Remove the garlic and ready to be served with the yam cake.


Ingredients for Spicy Sauce:

2 red chilies 
1 clove of garlic
3 tablespoons of dried chili paste
1 1/2 cups of water
3 tablespoons of white sugar
1 tablespoon of white vinegar
1/2 tablespoon of corn flour (mix with 2 tablespoons of water)
Salt to taste

Instructions:

Blend red chilies with garlic until smooth and pour in a pot.
Add water, dried chili paste, white vinegar and white sugar and bring the mixture to boil over medium heat.
Lower the heat, add corn flour mixture and allow it to simmer over low heat until it thickens.
Season with salt.
Ready to be serve with the yam cake.


Saturday, 15 February 2020

Puding Roti Blueberry Tanpa Telur (Eggless Blueberry Bread Pudding)


This is my first baked dessert that I prepared after quite some time.
Lately, I'm too lazy to prepare any dessert, mainly because we both have been consuming too much  cookies since before Chinese New Year.
Usually, whenever I wanted to sell new cookies products, I will bake at least two small batches for each product, where the second batch is usually baked to improve the outcome of the first batch's cookies by adjusting the ingredient's measurement.
Since most of my regular customers prefer less sweet and crunchy cookies, while expecting soft, melt-in-your-mouth and a bit sourish pineapple tart, all the hard work to do baking experiments paid off by thumbs-up from my customers.😉
I don't prefer to give my "experimented cookies" to anybody,so..we both have to finish them all, munching them piece by piece while watching our favorite TV shows.
(That's why I've never step on my weighing scale when there's a lot of cookies at my home because I'm going to freak out to see how many kg I've gained!) 😅

Bread pudding is a delicious dessert, even when enjoyed without the sweet sauce or toppings.
The classic version of bread pudding is the one topped with raisins.
In my previous posts, I shared two versions of my bread pudding - one topped with black raisins and the other one was a chocolate bread pudding topped with banana.
Eggy, milky, buttery and scrumptiously flavored and easy to be prepared dessert...this is all I can conclude about bread pudding.
To cook it, you may either use steaming or baking technique, but I usually would prefer to bake my bread pudding.
By baking, my bread pudding is more fragrant with crispy layer on top particularly when enjoyed warm.


This time I made different version of bread pudding, which is without the additional of egg.
It is suitable for those who are allergic to egg, and the fresh milk can always be substituted with vegan milks such as almond milk or coconut milk.
But for me, I'll still prefer using fresh milk for my bread pudding.
It turned out perfectly, moist and soft, milky and rich in blueberry flavor.

We love to enjoy our blueberry bread pudding when chilled, and it's richer in flavors when you keep your baked pudding refrigerated until the next day.
You may add a tablespoon of custard flour in the liquid mixture to add more flavor in the bread pudding.

Usually whenever I bake bread pudding, we'll enjoy it on the next day.
It is a fulfilling sweet dessert  that you can have it as your breakfast!


I baked my blueberry bread pudding individually in ramekin cups, but you may also use casserole or baking pan to bake your pudding.
I would recommend to use 8x8 inch baking pan, so the pudding would not have become too flat.
For this version, I used wholewheat bread.
You are free use any kind of bread, including croissant.
I haven't tried making my bread pudding with croissant before but I've seen croissant bread pudding recipes in Pinterest.
Croissant is not regular at our home since my hubby is not a fan of croissant.
You need extent the resting time if you're using croissant to get soft, dense bread pudding.
I used blueberry filling in this recipe, but may substitute with fresh blueberries.

Since this was my first successful trial of making my bread pudding without an egg, I am so excited to blog about this recipe.
Lets dive deeper into the details of the recipe.


EGGLESS BLUEBERRY BREAD PUDDING


Category: Dessert, Snack, Breakfast
Serve: 6


Ingredients:

10 slices of bread
2 cups of fresh milk
4 tablespoons of sugar
2 tablespoons of melted butter
1 teaspoon of vanilla essence
1 tablespoon of custard flour - optional

Topping:

Blueberry filling
Powdered sugar  (for dusting) - optional


Instructions:

Preheat oven to 200℃ or 392℉.

Cut the sliced bread into small cubes (or you can shred the bread with your hand) and place in a large bowl.  Set aside.

In a separate bowl, combine fresh milk, vanilla essence, sugar and custard flour (if using).  Whisk until the sugar dissolved.

Pour the liquid mixture in the bowl containing the cubed bread.  Mix and gently press down the bread with a spoon or spatula to immerse and soak the bread evenly.  Let the pudding mixture sit for 5 minutes.

Meanwhile, prepare 6 medium sized ramekin cups and grease each cup with butter.  Place the greased ramekin cups onto a baking pan.

Pour in the pudding mixture into the prepared ramekin cups until 3/4 full.

Top with two to three tablespoons of the blueberry filling and spread the filling evenly.

Bake in the preheat oven on the bottom rack for 40 minutes to 1 hour or until the bread pudding is set.  You may remove the pudding from the oven once you see a gap between the edges and the side of the cup.

Let the bread pudding cool on a wire rack.

Sift some powdered sugar on top of the pudding (optional) before serving.

Enjoy!


#NOTE#

Kindly ensure to let the blueberry bread pudding completely cooled before making any attempt to remove the pudding from the ramekin cup, I would suggest to let the pudding chilled first for at least 2 to 3 hours, until the pudding firm and hold it's shape.


Sunday, 10 November 2019

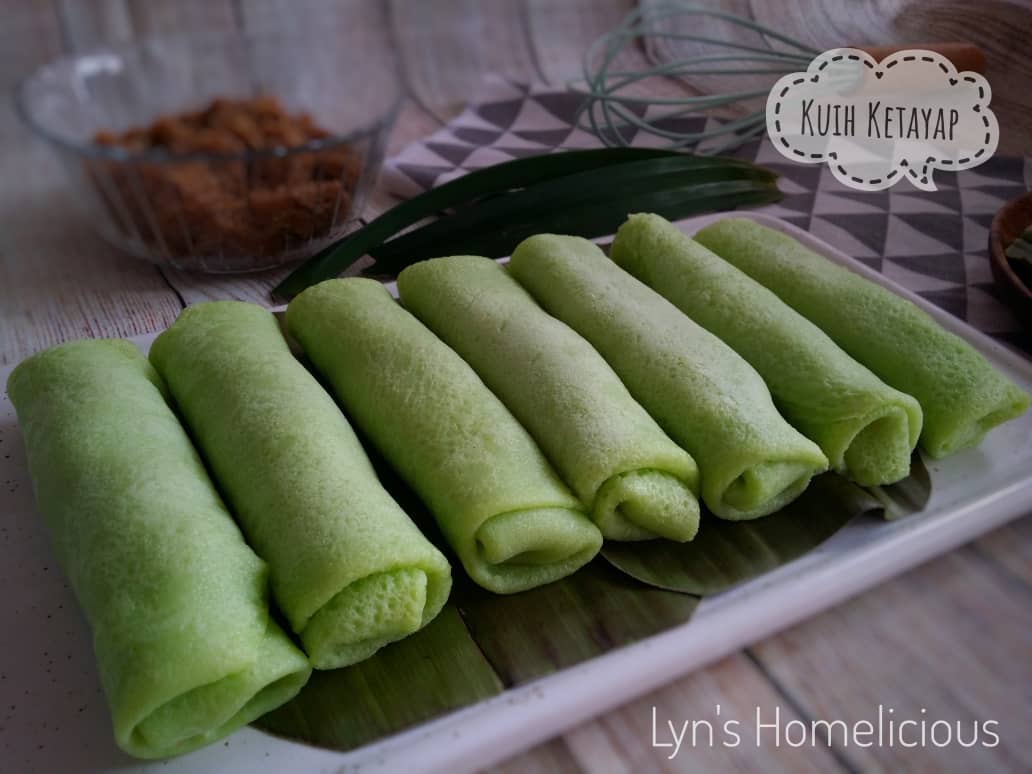
Kuih Ketayap


Kuih Ketayap is one of common Malay and Nyonya's kueh.
It is made of coconut pandan crepe, rolled and filled with inti kelapa (sweet coconut filling).
Usually, kuih ketayap is enjoyed as breakfast, snack and also as the side for iftar (breaking of the fast).

I have to confess that kuih ketayap is not my favorite kuih.
After I made it by myself, I started to like kuih ketayap more 😆😜.
This is my second time making kuih ketayap by myself to finish the inti kelapa leftover from making kuih koci (Malay sweet dumplings) the other day.
I made kuih ketayap for our breakfast today.
I made it smaller, using the 14 cm pan, so I did not have to cut the kueh into two when I served.
I only ate two out of thirteen, so the rest went into my hubby's mouth.
Luckily he is not very demanding when I'm making cake or kueh, just make them less sweet since he's not very fond of consuming too much sugar in his desserts.

I grow my second pandan tree at my mini garden since I love to use pandan leaves to add flavors and aroma in my cooking and baking.
Pandan leaf is staple in Asian countries and various local desserts as well as cooking require pandan leaf to make the delicacies more fragrant.
Since I grow my pandan tree in a vase, the leaves are medium-small in size, so you need to adjust the quantity of pandan leaves that you're going to use for making kuih ketayap.
Basically, the more pandan leaves we use, the more concentrated pandan juice we will obtained, so our kuih ketayap will have a stronger pandan flavor.

However, you are free to use pandan essence in case you don't have pandan leaves at home.
The difference is that, the taste of pandan essence or extract is slightly stronger, just a few drops of pandan essence is sufficient for this recipe.
Pandan juice when added in the batter will have a pale green in color, you may need to add green coloring to enhance the color of the kuih ketayap.

For the inti kelapa or sweet coconut filling, you can get my recipe here.


KUIH KETAYAP


Cuisine : Malay/ Nyonya
Course : Breakfast & Snack
Yield : 13 mini kueh


Ingredients For The Crepe:

1 cup of all purpose flour
1 tablespoon of corn flour
1/2 teaspoon of salt
1 large size egg
1 tablespoon of vegetable oil
1/2 teaspoon of green coloring - optional
1 cup of coconut milk or 1/4 cup of coconut cream + 3/4 water
3/4 cup of water (to blend pandan leaves)
3 pandan leaves


Filling :


Instructions:


  1. Blend pandan leaves with 3/4 cup of water.  Strain to obtain the pandan juice.
  2. Mix pandan juice with coconut milk in a mug.
  3. In a bowl, whisk in all purpose flour, corn flour and salt.
  4. Slowly pour in pandan juice mixture into the flour mixture while stirring to prevent lumps formation.
  5. Crack in an egg and add a tablespoon of vegetable oil and green coloring (if using).
  6. Strain to get a smooth textured batter.
  7. Heat a non-stick flat pan (I used 14 cm pan), lightly grease with oil.
  8. When the pan is hot, pour a small ladle of the batter at the center of the pan.  Swirl the pan to evenly cover the bottom of the pan.  Cook at a low heat.
  9. When the crepe surface is dry and the sides easily detach from the pan, loosen the crepe with a spatula and remove it and place on a plate.  Only need to cook at one side.  The crepe can be stacked as they would not stick together.
  10. Repeat for the remaining batter.

To Assemble Kuih Ketayap:

Place one crepe on a plate with the cooked side at the bottom. 
Place a spoonful of the filling (more or less, depending on your crepe size) at the center and roll it up like rolling a spring roll.
Serve warm.

Store the leftover in an air-tight container.


MALAY VERSION


Resepi Kuih Ketayap


Bahan-bahan:

1 cawan tepung gandum
1 sudu besar tepung jagung
1/2 sudu teh garam halus
1 biji telur Gred A
1 sudu besar minyak masak
1/2 sudu teh pewarna hijau  - tambahan
1 cawan santan atau 1/4 cawan santan krim (KARA) + 3/4 cawan air
3/4 cawan air (untuk mengisar daun pandan)
3 helai daun pandan

Inti:


Cara Penyediaan:

  1. Kisar daun pandan bersama 3/4 cawan air untuk mendapatkan jus pandan.  Tapis dan campurkan jus pandan bersama santan di dalam sebuah gelas atau mangkuk.
  2. Di dalam mangkuk lain, campurkan tepung gandum, tepung jagung dan garam.  Whisk rata.
  3. Tuang campuran jus pandan tadi ke dalam adunan tepung sedikit demi sedikit sambil kacau.
  4. Bila dah sebati, pecahkan sebiji telur dan masukkan minyak dan pewarna hijau (jika guna).
  5. Tapis untuk mendapatkan adunan yang halus.
  6. Panaskan kuali leper non-stick (saya pakai saiz 14 cm) dan gliskan sedikit minyak.
  7. Bila kuali telah panas, tuangkan satu senduk kecil adunan di tengah-tengah kuali dan hayun ringan kuali supaya adunan rata.  Masak dengan api kecil.
  8. Bila permukaan dadar pandan dah kering dan bahagian sisi tak melekat lagi pada kuali, angkat dan letak dalam pinggan.  Dadar hanya perlu dimasak pada 1 bahagian saja.  Boleh susun dadar pandan secara bertingkat kerana ianya tak melekat.
  9. Ulang sehingga adunan habis.

Cara Menggulung Kuih Ketayap:

Letakkan sekeping dadar pandan di atas pinggan. Bahagian yang dimasak diletakkan di bawah ye.
Tuangkan satu sudu (bergantung pada saiz dadar pandan anda) inti di tengah-tengah dadar pandan dan gulung seperti menggulung popiah.
Hidangkan serta-merta.


Monday, 28 October 2019

Kuih Ros Bijan & Pedas/ Spicy & Sesame Honeycomb Cookies


Honeycomb cookies, or better known as kuih ros or kuih goyang among Malaysian is a traditional cookies, with crispy textured with sweet and creamy taste due to its coconut milk being one of the main ingredient.
These cookies, are more popular among the older generations, and one of a must have cookies along with kuih bangkit (tapioca cookies) and rempeyek (peanut brittle) especially during Eid Mubaraka.
I'm personally not a fan of these cookies (since I've never made it on my own), but when I have to choose between honeycomb cookies with rempeyek, I would choose the former definitely.

Honeycomb cookies are already delicious on their own, without additional condiment.
However, I think similar like the way people communicate - from phone and email to Facebook and Instagram, certain food also need to revolutionize into different flavors, so people have many options to enjoy their food.
So, I decided to make my honeycomb cookies, instead of plain like the original version, into two different flavors.
I divided the basic batter into two separate bowl and mix each of them with different condiments.

I used rice flour Teratai brand, which is suitable for making crispy cookies such as honeycomb cookies and peanut brittle and also for making coating batter for banana fritter.
Last time I used rice flour Tiga Gajah brand to make kuih kapit or Chinese love letter, my kuih kapit turned out to be harder than kuih kapit that I made using Teratai brand.
We want our honeycomb cookies to be crispy and crunchy, so we need to choose the right rice flour for our cookies.


KUIH ROS BIJAN & PEDAS (SESAME & SPICY HONEYCOMB COOKIES)


Course : Snack
Yield : Approximately 70 pieces


Ingredients:


Basic batter:

250 grams of rice flour (use Teratai brand)
1/2 cup of wheat flour /all purpose flour
3/4 cup of coconut cream (I used KARA)
1 3/4 cups of water
1 medium size egg
1 tablespoon of lime stone water


Add in all the ingredients in a large bowl and whisk to combine.
Divide the batter into two separate bowls.
We are going to add different condiments for each bowl.


The first bowl (sesame flavor), you need to add:

1/4 cup of sugar
1/2 teaspoon of salt
White sesame (begin by adding 1/4 cup first - later we need to add more sesame into the batter)

Add the ingredients into the batter in the first bowl.
Mix well.


The second bowl (spicy flavor), you need to add:

1 tablespoon of dry shrimp (soaked 5 minutes)
1 tablespoon of coriander seeds (soaked 10 minutes)
1 tablespoon of fennel seeds (soaked 10 minutes)
3 cloves of garlic
1 tablespoon of chili powder
1 teaspoon of anchovies powder
1 teaspoon of salt
1 tablespoon of sugar

Grind dry shrimp, coriander and fennel seeds, and garlic using mortar and pestle or dry blender.
Add ground and the remaining ingredients into the second bowl and whisk to combine.
You may need to add more water if the batter is too thick.


FRYING THE HONEYCOMB COOKIES

Half fill a deep frying pan with oil.  Heat oil and place the honeycomb cookies mold into the pan heat it up.
When the oil and the mold are hot, shake the mold to remove excess oil and dip the hot mold into the batter, make sure the batter did not go to the top of the mold when dipping.
Submerge the mold into hot oil and do not touch the base of the pan.  Shake loose the cookies off it's mold.
Use wooden skewer or chopstick to loosen the cookies if it stick to the mold.
Fry until golden brown under medium heat.
Place the fried honeycomb cookies on a strainer or paper towel to remove excess oil.
Cool completely and store in an air-tight container.

Spicy honeycomb cookies/ Kuih ros pedas

Sesame honeycomb cookies/ kuih ros bijan

#NOTE#

For sesame batter, the sesame will float on the batter surface.  You need to add sesame into the batter from time to time to ensure even sesame coating on the honeycomb cookies.


INSTRUCTION IN MALAY

Bahan Asas Kuih Ros:

250 gram tepung beras (guna cap Teratai)
1/2 cawan tepung gandum
1 biji telur (Gred B)
3/4 cawan santan pekat (KARA)
1 3/4 cawan air
1 sudu besar air kapur

Campurkan kesemua bahan di dalam mangkuk besar dan kacau rata menggunakan whisk.
Bahagi adunan kepada dua bahagian di dalam dua manguk yang berasingan.


Untuk adunan kuih ros bijan perlu tambah:

1/4 cawan gula pasir
1/2 sudu teh garam
Bijan secukupnya

Campurkan bahan ke dalam adunan dalam mangkuk pertama.  Kacau rata.


Untuk adunan kuih ros pedas perlu tambah:

1 sudu besar udang kering (rendam 5 minit)
1 sudu besar ketumbar biji (rendam 10 minit)
1 sudu besar jintan manis (rendam 10 minit)
3 ulas bawang putih
1 sudu teh garam 
1 sudu besar gula pasir
1 sudu besar serbuk cili

Tumbuk halus udang kering, ketumbar, jintan manis dan bawang putih. 
Campurkan kesemua bahan di dalam adunan dalam mangkuk kedua dan kacau rata menggunakan whisk.
Tambah air lagi kalau adunan terlalu pekat.


Cara Menggoreng Kuih Ros

Panaskan minyak yang banyak di dalam kuali.
Panaskan acuan kuih ros dengan merendam acuan ke dalam minyak yang panas.
Bila acuan telah panas, goncang sekejap acuan untuk membuang minyak yang berlebihan dan celup acuan panas ke dalam adunan, pastikan adunan tak menutupi acuan bahagian atas dan rendam acuan di dalam minyak panas. Jangan sampai acuan menyentuh dasar kuali.
Goreng hingga kuning keemasan dengan api sederhana.
Bila kuih telah masak, angkat dan toskan di atas penapis atau tisu dapur untuk membuang minyak yang berlebihan.
Sejukkan sebelum disimpan di dalam bekas kedap udara.


#NOTA#

Untuk adunan kuih ros bijan, anda perlu tambah bijan ke dalam adunan dari semasa ke semasa untuk menghasilkan coating bijan yang rata dan cantik pada kuih ros anda. 

Thursday, 10 October 2019

Chocolate Banana Bread Pudding


Everyone know what bread pudding is.
It's a simple bread-based dessert and is usually eaten with custard gravy.
You can put in raisins, chocolate chips or nuts into your bread pudding to add in nutrients and burst it's flavors.

But today I'm not gonna talk about the standard bread pudding.
How about we create our bread pudding with a little touch of creativity to satisfy our sweet tooth?
This one is especially for the chocolate lovers!
I have six sliced bread leftovers, which I made with the help of my bread maker.
So, I was thinking on how to finish my bread other than turning them into "roti telur."
Since I still have a comb of "pisang kepok" or "pisang kapok"  -(Saba banana) - a highly demanded banana with multi-purpose usage to make banana fritter, Malay kuih and desserts and crispy banana chips.
I admit it's pretty hard to find pisang kepok in local market due to its high demand.
But I was lucky to manage to buy pisang kepok when my Hubby and I was on our way to Pantai Dalam to buy the famous Ayam Golek there.

With these two ingredients available at home, so I decided to prepare a decadent dessert for out tea time.
It's so easy to prepare, all you have to do is cubed or shred the bread, spread them into a greased baking pan or casserole, then, mix all the milk mixture (eggs, butter, sugar, salt, coco powder, vanilla) and pour in the mixture and let the bread soaked for a while, so, the texture will be dense.
After that, you can sprinkle chocolate chips and sliced bananas on top.
Press down the bananas a bit to let them stick firmly on top of the pudding.
You got two options - you can either steam or bake your chocolate banana bread pudding.
As always, I would prefer to bake the bread pudding because baked bread pudding will have a more rounded flavor, due to the browned edges.

If you find it hard to find pisang kepok, you can always switch to any kind of banana of your preference.
Overnight chocolate banana bread pudding taste better as all the flavors are diffused together.
We both prefer to enjoy our bread pudding chilled.
It is so delicious and moist that you won't need to bathe the bread pudding in a custard gravy!
So, this one is another kind of dessert that is already delicious just by itself.

Lets go through the nitty gritty of making these amazingly delicious bread pudding.


CHOCOLATE BANANA BREAD PUDDING


Course : Dessert
Serve : 6


Ingredients:


6 slices of bread - cubed/ shred
1/2 cup of chocolate chips
4 saba banana - sliced
3 large eggs
2 cups of milk
3 tablespoons of butter/margarine - melted and cooled
1/2 teaspoon of salt
1/3 cup of sugar
1/4 cup of coco powder
1 teaspoon of vanilla essence 


Instructions:


Spread cubed/ shred bread in a greased 8x8 inch baking pan or a casserole.


In a bowl, cracks in eggs, followed by adding sugar.  Whisk the mixture until sugar dissolved.


Add in salt, melted butter, coco powder, milk and vanilla essence and whisk to combine.  Don't worry if the coco powder forms small lumps.


Pour in the mixture into a prepared baking pan, press down the bread with a spoon or spatula to let it soaks evenly.  


Lastly, top the bread pudding with chocolate chips and sliced bananas.


Bake in a preheat oven at 180℃ for 1 hour, or until inserted wooden skewer comes out clean.
Let it cool for at least one hour before eating.

Keep the leftovers refrigerated in an air tight container.


Thursday, 29 August 2019

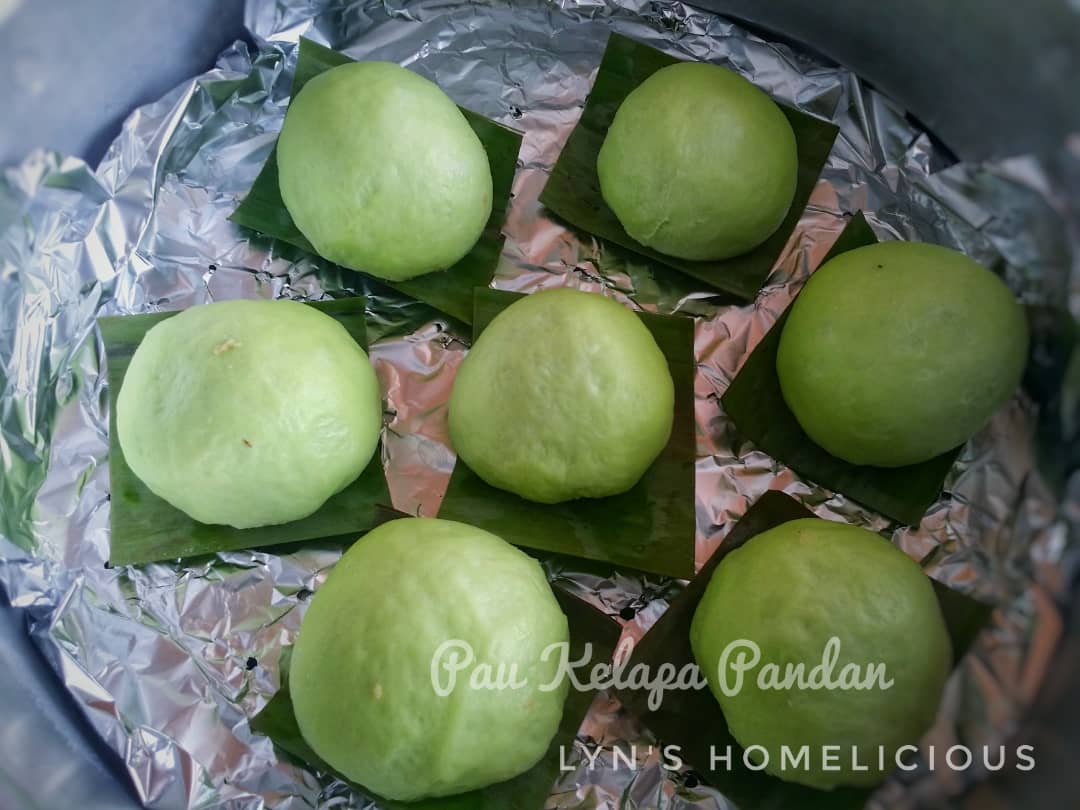
Pau Kelapa Pandan Tanpa Telur (Eggless Pandan Coconut Steamed Bun)


No matter how much we adore food from different cultures, there's nothing that can compare to our own local dishes.
I have a belief that I have to first to learn making staple dishes of my own culture before I make a step ahead to learn to make other dishes.
Because that's how we learn to differentiate between cultures, that is by knowing their signature dishes and their unique preparations.

Today I want to share another popular signature dish among Malay, Chinese and some other parts of Asian countries.
It's called steamed bun.
In Malay, we called it as "kuih pau."
It looks exactly like a bun, but instead of baking it oven, we use the steaming method to cook it.
I prefer to make my homemade steamed bun in several batches and keep them frozen.
Steamed bun is always one of my hubby's favorite snack and breakfast.

Basic pau shape is round and slightly flat.
Pau or known as Baozi is a quintessential street food in Chinese and Taiwanese cultures for centuries.
While Malay is well known for it's round shaped steamed bun, Chinese's baozi has a more unique shape.
It needs some skill in pleading the dough to obtain the nicely shaped baozi.
The fillings, they can range from sweet fillings like coconut filling, red bean filling, kaya (coconut egg jam) to savory fillings such as chicken or beef curry, rendang (savory chicken dish) and pork.


Today I made pandan coconut steamed bun, or pau kelapa pandan in Malay.
The steamed bun preparation consists of a few steps.
You may either prepare the the filling ahead of time then followed by making the dough.
Steamed bun's dough requires two cycles of proofing, first after you knead the dough to form a round shaped dough ball and the second proofing is after you stuff your dough balls with filling.
Lastly is steaming the buns.


The Importance of Kneading

A good texture steamed buns must have a soft, fluffy and the skin that bounce back when you press it with your fingers.
That is why kneading is very important in making steamed bun.
Kneading allows air bubbles to form evenly inside the dough and helps to obtain a smoother appearance of the dough skin.
Kneading can be done manually, by using your hands or with the helps of machine like stand mixer and bread maker.
Definitely, if you're using machine to do the kneading and mixing, it'll surely going to safe your energy!
For me, my steamed bun have a smoother and fluffier shaped when I knead after the dough has risen.
Usually the kneading process takes place before the first proofing.
Am I right?
However, if you knead your dough for two times - first before first proofing and the second one after the dough has risen, that is before you shape the buns until it returns to the original size.
These will helps to get a smooth look on your buns.

Pau dough before it is rested
After the first proofing, the dough is doubled in size
Punch and knead the dough until it returns to it's original size


How to know if the yeast is still active?

Another factor is to ensure the instant yeast that is used is still active.
To test it, simply combine warm water, sugar and the yeast and let it soaked for few minutes until large bubbles appear.
This indicates that the yeast is still active.
Add in some oil and baking powder will also contribute to the smooth and fluffy textured steamed buns.


Another tips to shape the steamed bun for a fluffier bun's texture

When you roll the divided dough into small balls, make sure not to roll them too thin (especially the middle part), otherwise your steamed bun may not turned fluffy as what you're hoping for.
You need leave the dough to be ticker in the middle part to allow more dough in the center, so that it'll rise nicely when you steam the buns.
This is important especially when you're making a round shape steamed bun.


When you roll your dough, make sure the middle part is thicker than the edges, to get a fluffier, bulgier pau.


How Long Does It Takes To Rest The Dough (First Proofing)?

Basically, you're required to let your dough well rested until it doubles in size.
It should takes about 40 minutes if the room temperature is high, but first proofing shouldn't be more than 2 hours unless the temperature is very cold.
Resting or proofing the dough is where the fermentation process takes place.

Tips to accelerate resting process, you can:


  • place the dough in a warm place, it can be either a place with exposure of sun light or nearby preheated oven.
  • use warm instead of cold, room temperature water to make the dough.
  • Heat up a glass of plain water in a microwave, then put your dough bowl inside (with the glass in) and shut the microwave door.
Make sure you cover the dough with a damp cloth or seal the dough bowl with a cling wrap, because apart from preventing the dough surface from getting dry, humidity also helps to improve fermentation rate.


How To Avoid Collapsing Or Wrinkly Steamed Bun?

The most common problem when making pau or steamed bun's are the skin collapse with wrinkly textured.
I faced the similar problems before.
Upon making a few trials, I can conclude that it can be due to the temperature use when you steam your bun.
I've came across some of the tips before, and it says that in order to prevent the steamed bun from sudden collapsing, you should wait for a few minutes before you uncover the steamer and the pau or steamed bun should be steamed under high heat.
I've followed this tips before and my pau were still collapsing with a lot ugly wrinkles on top.
I used my mum's old steamer with bigger holes.
So, I initially thought that was the culprit.
After several attempts, then only I managed to steam my pau perfectly.

The secret here is the steaming temperature.
You need to understand what cause the sudden collapse and wrinkles formation to your steamed bun.
Sudden collapse occurs when you steam your pau with high heat or temperature, the high pressure from the heat abruptly forcing your pau to it's maximum raising capability and sudden drop in temperature when you remove your pau away from heat source will leads to collapsing.
Second, steaming under high heat will cause a lot of water vapor formation and condensation of water vapors can drop onto the pau even when you cover the steamer lid with towel.
Third, I've tried this way for several times.  If can, try to put an empty steamer basket (if available) underneath the basket that you fill with pau to cook. 
This is to let some gap between the hot water at the bottom from touching the bottom of the steaming basket that contains pau.

The best way to avoid those problems is to steam your pau under low to medium heat.
Try not to steam under boiling water, as using a lower heat will allow your pau dough to rise gradually and smoothly.
You may extend your steaming time up to 20 minutes under low heat.


This is my experiment on different steaming technique that yielded 2 different outcomes.
As you can see in (A): pau is wrinkly  & collapsed
The problems:
1. I steamed under high heat (boiling water)  - I cover the lid with towel
2. I didn't put empty steaming basket in the middle to add more gap.
While in (B) : I resolved all the above problems, so my pau turned out perfectly.


As for the pau skin, you can remained it plain.
But when I make pau with sweet coconut filling, I prefer the combination of pandan and coconut flavors, and I want to add some color to their skin, that's why I added pandan juice in the dough.


Blend pandan leaves with water to get the pandan juice, strain before use to make pau dough


PAU KELAPA PANDAN
(PANDAN COCONUT STEAMED BUN)


Cuisine : Malay/ Chinese
Yield :20- 25


Ingredients:

1 1/2 pandan juice (blend 3 pandan leaves with 1 1/2 cup of water, strained)
1/4 cup of vegetable oil
a few drops of green coloring - optional
1/2 teaspoon of salt
1/2 tablespoon of sugar
1 tablespoon of sweetened creamer (susu pekat manis)
1/2 teaspoon of baking powder
500 grams or 4 1/2 cups of pau flour
2 1/2 teaspoons of active dry yeast
Additional 1/4 cup of water (if necessary)

Filling:

Sweet coconut filling (for recipe click here:
Inti Kelapa/ Sweet Coconut Filling

Others:

Paper cups/ baking paper/ banana leaf (cut into round/square shape) - to cover the bottom of the pau


Instructions:


PREPARE THE DOUGH

Manual Preparation :

Mix flour, baking powder, yeast, salt, sugar, sweetened creamer and oil in a bowl.
Add in pandan juice and green coloring while continue mixing.
Combine and knead the dough until it is smooth.
Cover the bowl with a damp towel or cling wrap and leave to rise in a warm place until it doubled in size.

Using Bread Maker:

Put all the ingredients inside the bread maker bowl and select the menu " dough."
Wait until it finishes kneading, which should takes about 20 minutes to complete.
Lightly oil a large bowl and transfer the dough into the prepared bowl.
Cover the bowl with a damp towel or cling wrap and leave to rise until it doubled in size.


SHAPE THE PAU/BUNS

After the dough has risen and doubled in size (about 40 to 1 hour), punch in the dough to break the air bubbles and knead the dough until it returns to it's original size.
Divide the dough into 25 portions (or 20 if you prefer them bigger in size), flatten the dough with a rolling pin or press with your fingers (remember to leave the middle part slightly thicker) and place a teaspoon (or more) in the middle and tightly seal the pau or bun.
Place a sheet of paper cup or banana leaf cover the bottom.
Place all the assembled pau in a tray, make sure to leave some space in between and let them rest for another 15 to 20 minutes.
To prevent the pau's surface from getting dry, spray or sprinkle water occasionally until they are ready to be steamed.


STEAM THE PAU/BUNS

Arrange the pau into the steaming basket, allow two inches apart between pau and the side of the steamer.
(If your steamer's holes are too large, you can place a sheet of aluminium foil underneath the pau.  Poke a lot of small holes on it using a wooden skewer).
Preheat water until you see the vapor starts to form.
Cover the lid with towel or aluminum foil.
Steam the pau under medium heat for 15 to 18 minutes.

Leave some gap in between pau and the sides of the steamer to prevent sticking during steaming.
The freshly cooked pau ready to be eaten 😋


SERVING & STORAGE

Serve the steamed buns or pau warm.
You can freeze the leftover, keeping them in a container or sealed plastic.
You can straight away steaming the frozen pau until they turned soft again. (It should takes about 15 to 25 minutes).

Store the cooked pau in plastic bags and keep them frozen