Pau Kelapa Pandan Tanpa Telur (Eggless Pandan Coconut Steamed Bun)

No matter how much we adore food from different cultures, there's nothing that can compare to our own local dishes.
I have a belief that I have to first to learn making staple dishes of my own culture before I make a step ahead to learn to make other dishes.
Because that's how we learn to differentiate between cultures, that is by knowing their signature dishes and their unique preparations.
Today I want to share another popular signature dish among Malay, Chinese and some other parts of Asian countries.
It's called steamed bun.
In Malay, we called it as "kuih pau."
It looks exactly like a bun, but instead of baking it oven, we use the steaming method to cook it.
I prefer to make my homemade steamed bun in several batches and keep them frozen.
Steamed bun is always one of my hubby's favorite snack and breakfast.
Basic pau shape is round and slightly flat.
Pau or known as Baozi is a quintessential street food in Chinese and Taiwanese cultures for centuries.
While Malay is well known for it's round shaped steamed bun, Chinese's baozi has a more unique shape.
It needs some skill in pleading the dough to obtain the nicely shaped baozi.
The fillings, they can range from sweet fillings like coconut filling, red bean filling, kaya (coconut egg jam) to savory fillings such as chicken or beef curry, rendang (savory chicken dish) and pork.
Today I made pandan coconut steamed bun, or pau kelapa pandan in Malay.
The steamed bun preparation consists of a few steps.
You may either prepare the the filling ahead of time then followed by making the dough.
Steamed bun's dough requires two cycles of proofing, first after you knead the dough to form a round shaped dough ball and the second proofing is after you stuff your dough balls with filling.
Lastly is steaming the buns.

The Importance of Kneading
A good texture steamed buns must have a soft, fluffy and the skin that bounce back when you press it with your fingers.
That is why kneading is very important in making steamed bun.
Kneading allows air bubbles to form evenly inside the dough and helps to obtain a smoother appearance of the dough skin.
Kneading can be done manually, by using your hands or with the helps of machine like stand mixer and bread maker.
Definitely, if you're using machine to do the kneading and mixing, it'll surely going to safe your energy!
For me, my steamed bun have a smoother and fluffier shaped when I knead after the dough has risen.
Usually the kneading process takes place before the first proofing.
Am I right?
However, if you knead your dough for two times - first before first proofing and the second one after the dough has risen, that is before you shape the buns until it returns to the original size.
These will helps to get a smooth look on your buns.
 |
| Pau dough before it is rested |
 |
| After the first proofing, the dough is doubled in size |
 |
| Punch and knead the dough until it returns to it's original size |
How to know if the yeast is still active?
Another factor is to ensure the instant yeast that is used is still active.
To test it, simply combine warm water, sugar and the yeast and let it soaked for few minutes until large bubbles appear.
This indicates that the yeast is still active.
Add in some oil and baking powder will also contribute to the smooth and fluffy textured steamed buns.
Another tips to shape the steamed bun for a fluffier bun's texture
When you roll the divided dough into small balls, make sure not to roll them too thin (especially the middle part), otherwise your steamed bun may not turned fluffy as what you're hoping for.
You need leave the dough to be ticker in the middle part to allow more dough in the center, so that it'll rise nicely when you steam the buns.
This is important especially when you're making a round shape steamed bun.
 |
| When you roll your dough, make sure the middle part is thicker than the edges, to get a fluffier, bulgier pau. |
How Long Does It Takes To Rest The Dough (First Proofing)?
Basically, you're required to let your dough well rested until it doubles in size.
It should takes about 40 minutes if the room temperature is high, but first proofing shouldn't be more than 2 hours unless the temperature is very cold.
Resting or proofing the dough is where the fermentation process takes place.
Tips to accelerate resting process, you can:
- place the dough in a warm place, it can be either a place with exposure of sun light or nearby preheated oven.
- use warm instead of cold, room temperature water to make the dough.
- Heat up a glass of plain water in a microwave, then put your dough bowl inside (with the glass in) and shut the microwave door.
Make sure you cover the dough with a damp cloth or seal the dough bowl with a cling wrap, because apart from preventing the dough surface from getting dry, humidity also helps to improve fermentation rate.
How To Avoid Collapsing Or Wrinkly Steamed Bun?
The most common problem when making pau or steamed bun's are the skin collapse with wrinkly textured.
I faced the similar problems before.
Upon making a few trials, I can conclude that it can be due to the temperature use when you steam your bun.
I've came across some of the tips before, and it says that in order to prevent the steamed bun from sudden collapsing, you should wait for a few minutes before you uncover the steamer and the pau or steamed bun should be steamed under high heat.
I've followed this tips before and my pau were still collapsing with a lot ugly wrinkles on top.
I used my mum's old steamer with bigger holes.
So, I initially thought that was the culprit.
After several attempts, then only I managed to steam my pau perfectly.
The secret here is the steaming temperature.
You need to understand what cause the sudden collapse and wrinkles formation to your steamed bun.
Sudden collapse occurs when you steam your pau with high heat or temperature, the high pressure from the heat abruptly forcing your pau to it's maximum raising capability and sudden drop in temperature when you remove your pau away from heat source will leads to collapsing.
Second, steaming under high heat will cause a lot of water vapor formation and condensation of water vapors can drop onto the pau even when you cover the steamer lid with towel.
Third, I've tried this way for several times. If can, try to put an empty steamer basket (if available) underneath the basket that you fill with pau to cook.
This is to let some gap between the hot water at the bottom from touching the bottom of the steaming basket that contains pau.
The best way to avoid those problems is to steam your pau under low to medium heat.
Try not to steam under boiling water, as using a lower heat will allow your pau dough to rise gradually and smoothly.
You may extend your steaming time up to 20 minutes under low heat.
 |
| This is my experiment on different steaming technique that yielded 2 different outcomes. As you can see in (A): pau is wrinkly & collapsed The problems: 1. I steamed under high heat (boiling water) - I cover the lid with towel 2. I didn't put empty steaming basket in the middle to add more gap. While in (B) : I resolved all the above problems, so my pau turned out perfectly. |
But when I make pau with sweet coconut filling, I prefer the combination of pandan and coconut flavors, and I want to add some color to their skin, that's why I added pandan juice in the dough.
 |
| Blend pandan leaves with water to get the pandan juice, strain before use to make pau dough |
PAU KELAPA PANDAN
(PANDAN COCONUT STEAMED BUN)
Cuisine : Malay/ Chinese
Yield :20- 25
Ingredients:
1 1/2 pandan juice (blend 3 pandan leaves with 1 1/2 cup of water, strained)
1/4 cup of vegetable oil
a few drops of green coloring - optional
a few drops of green coloring - optional
1/2 teaspoon of salt
1/2 tablespoon of sugar
1 tablespoon of sweetened creamer (susu pekat manis)
1/2 teaspoon of baking powder
500 grams or 4 1/2 cups of pau flour
2 1/2 teaspoons of active dry yeast
Additional 1/4 cup of water (if necessary)
Filling:
Sweet coconut filling (for recipe click here:
Inti Kelapa/ Sweet Coconut Filling
Inti Kelapa/ Sweet Coconut Filling
Others:
Paper cups/ baking paper/ banana leaf (cut into round/square shape) - to cover the bottom of the pau
Instructions:
PREPARE THE DOUGH
Manual Preparation :
Mix flour, baking powder, yeast, salt, sugar, sweetened creamer and oil in a bowl.
Add in pandan juice and green coloring while continue mixing.
Combine and knead the dough until it is smooth.
Cover the bowl with a damp towel or cling wrap and leave to rise in a warm place until it doubled in size.
Using Bread Maker:
Put all the ingredients inside the bread maker bowl and select the menu " dough."
Wait until it finishes kneading, which should takes about 20 minutes to complete.
Lightly oil a large bowl and transfer the dough into the prepared bowl.
Cover the bowl with a damp towel or cling wrap and leave to rise until it doubled in size.


SHAPE THE PAU/BUNS
After the dough has risen and doubled in size (about 40 to 1 hour), punch in the dough to break the air bubbles and knead the dough until it returns to it's original size.
Divide the dough into 25 portions (or 20 if you prefer them bigger in size), flatten the dough with a rolling pin or press with your fingers (remember to leave the middle part slightly thicker) and place a teaspoon (or more) in the middle and tightly seal the pau or bun.
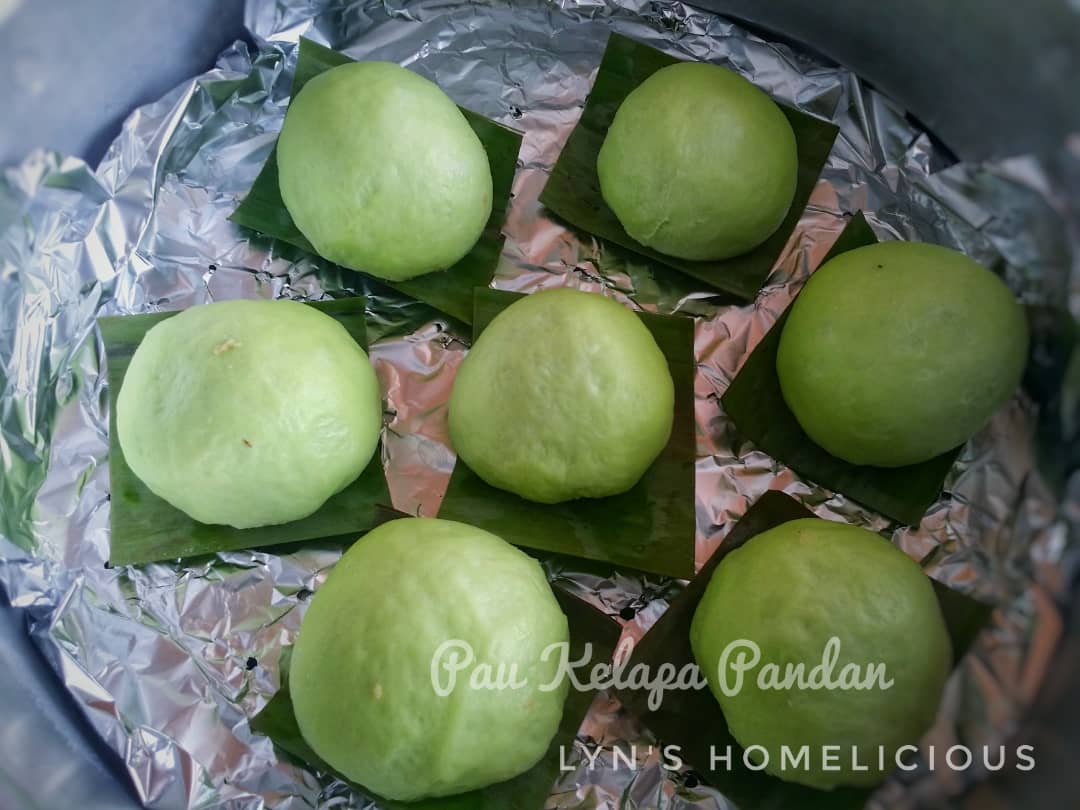
Place a sheet of paper cup or banana leaf cover the bottom.
Place all the assembled pau in a tray, make sure to leave some space in between and let them rest for another 15 to 20 minutes.
To prevent the pau's surface from getting dry, spray or sprinkle water occasionally until they are ready to be steamed.


STEAM THE PAU/BUNS
Arrange the pau into the steaming basket, allow two inches apart between pau and the side of the steamer.
(If your steamer's holes are too large, you can place a sheet of aluminium foil underneath the pau. Poke a lot of small holes on it using a wooden skewer).
(If your steamer's holes are too large, you can place a sheet of aluminium foil underneath the pau. Poke a lot of small holes on it using a wooden skewer).
Preheat water until you see the vapor starts to form.
Cover the lid with towel or aluminum foil.
Steam the pau under medium heat for 15 to 18 minutes.
 |
| Leave some gap in between pau and the sides of the steamer to prevent sticking during steaming. |
 |
| The freshly cooked pau ready to be eaten 😋 |
SERVING & STORAGE
Serve the steamed buns or pau warm.
You can freeze the leftover, keeping them in a container or sealed plastic.
You can straight away steaming the frozen pau until they turned soft again. (It should takes about 15 to 25 minutes).
 |
| Store the cooked pau in plastic bags and keep them frozen |


0 comments :
Post a Comment